Study Registration Wizard
Tutorial
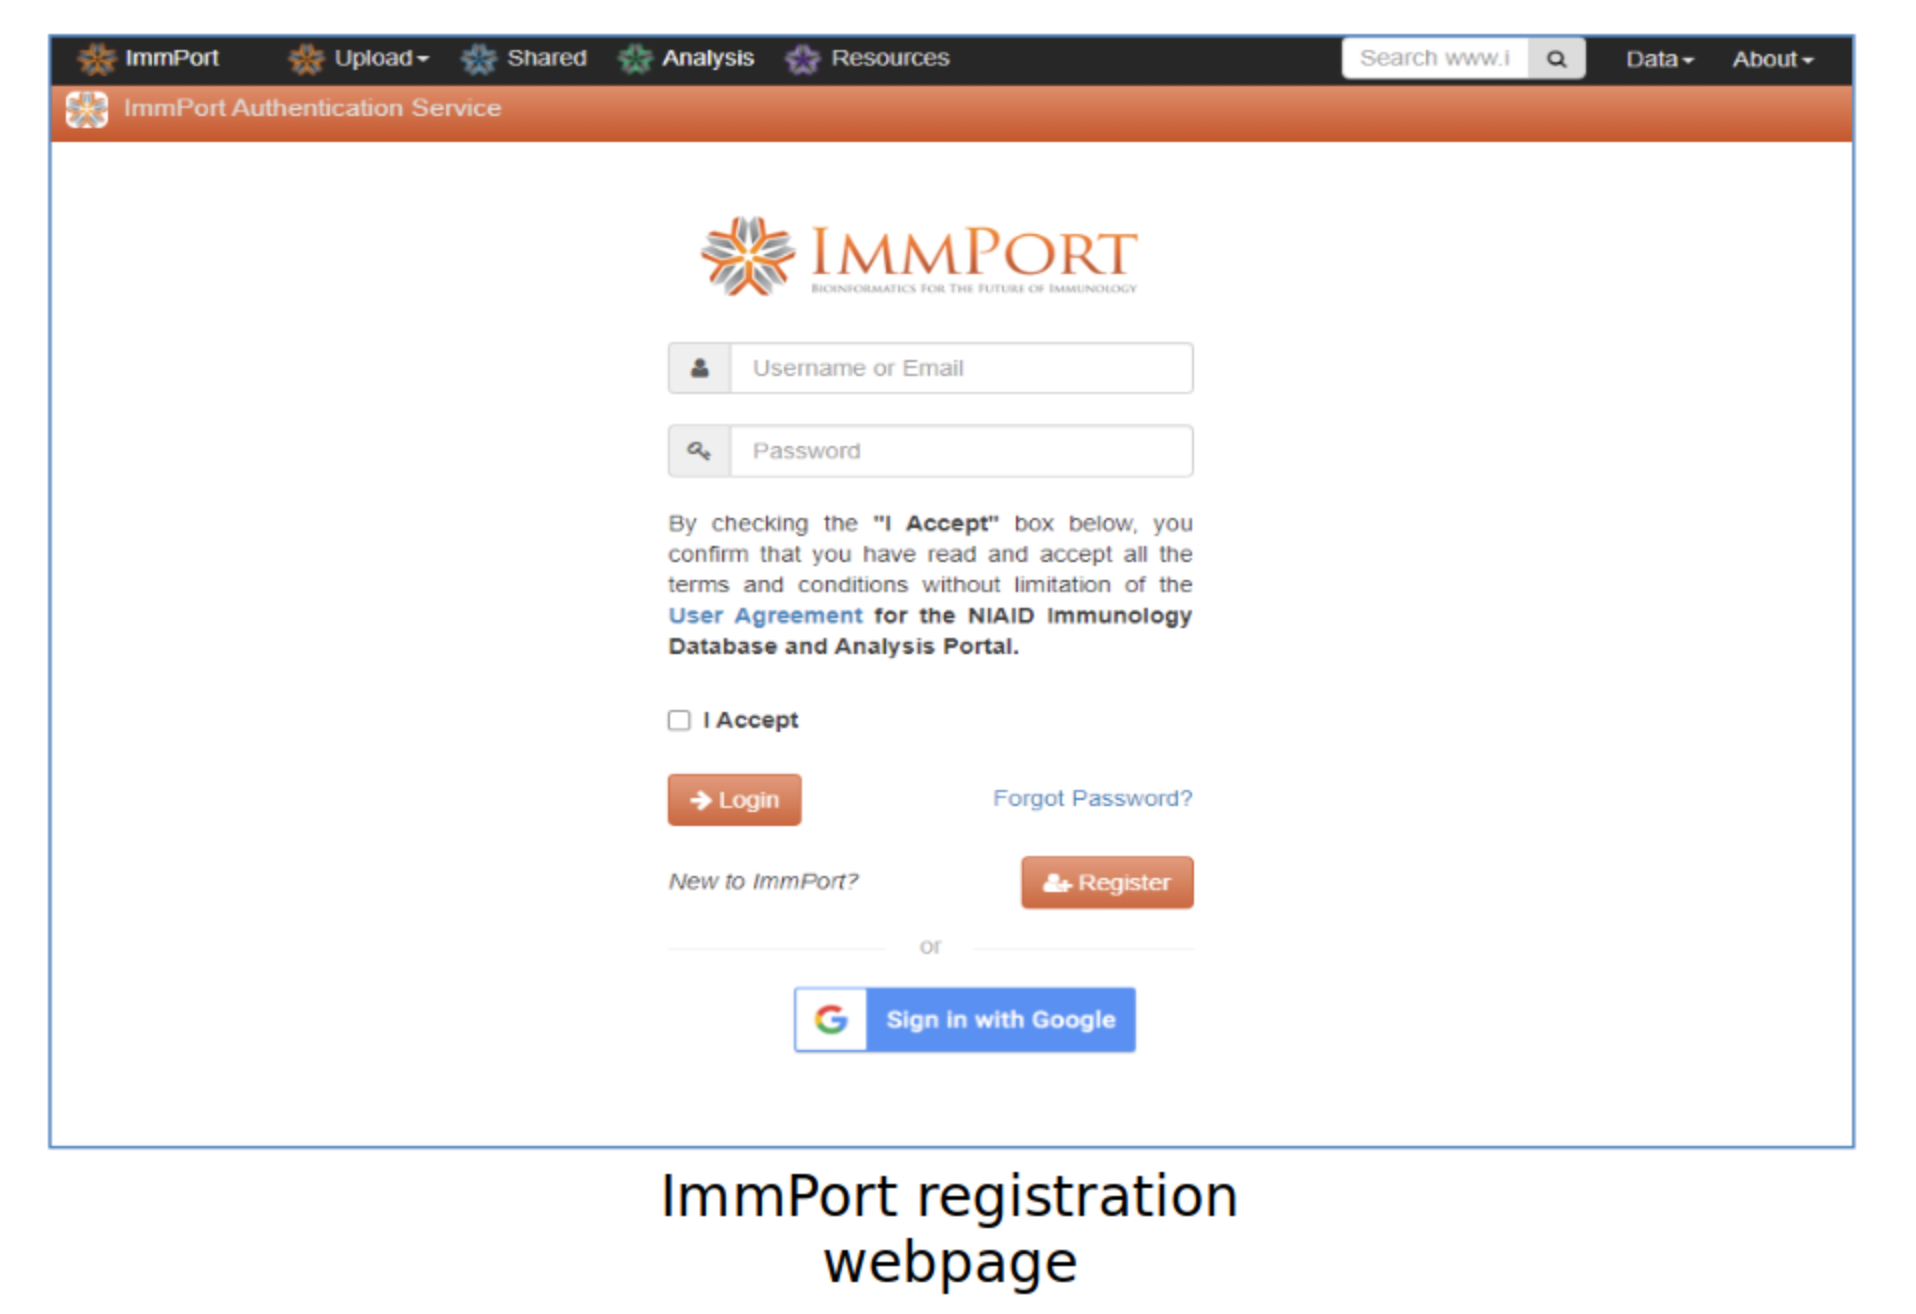
Welcome
If you have not registered for ImmPort please register and then contact the ImmPort Helpdesk to be assigned a private workspace to upload your data
Registration link:
ImmPort Registration
Helpdesk: ImmPort_Helpdesk@immport.org
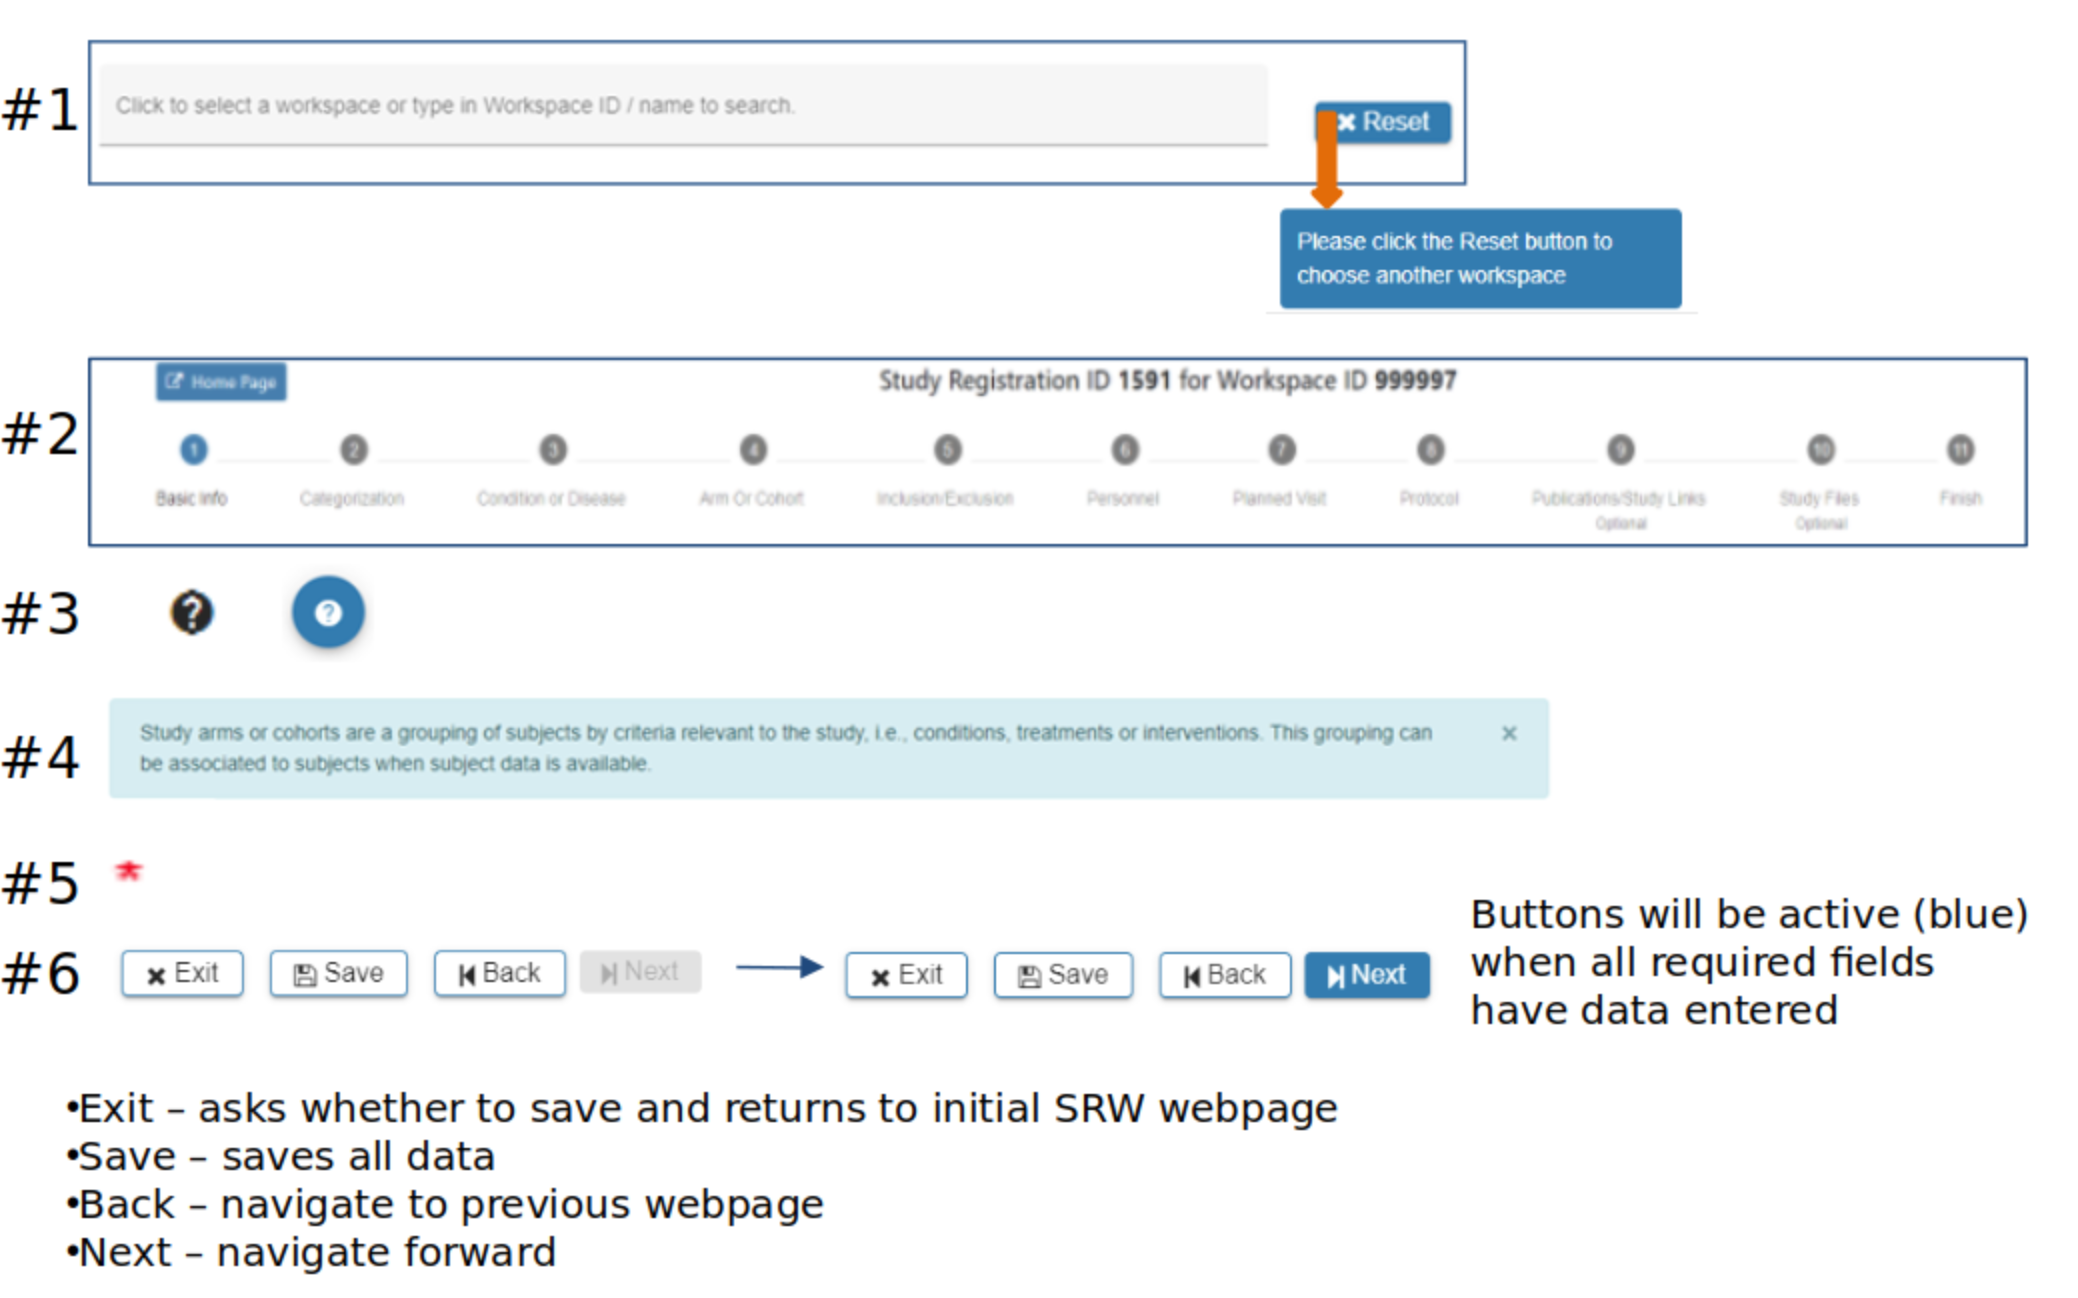
SRW Navigation
#2 Steps, or breadcrumb trail, indicates where you are in the SRW process
#3 Question marks indicate additional information is available with a mouse-over or click
#4 Light blue boxes provide guidance throughout the SRW
#5 Red asterisk indicates required fields
#6 Gray ‘Next’ button indicates data is missing
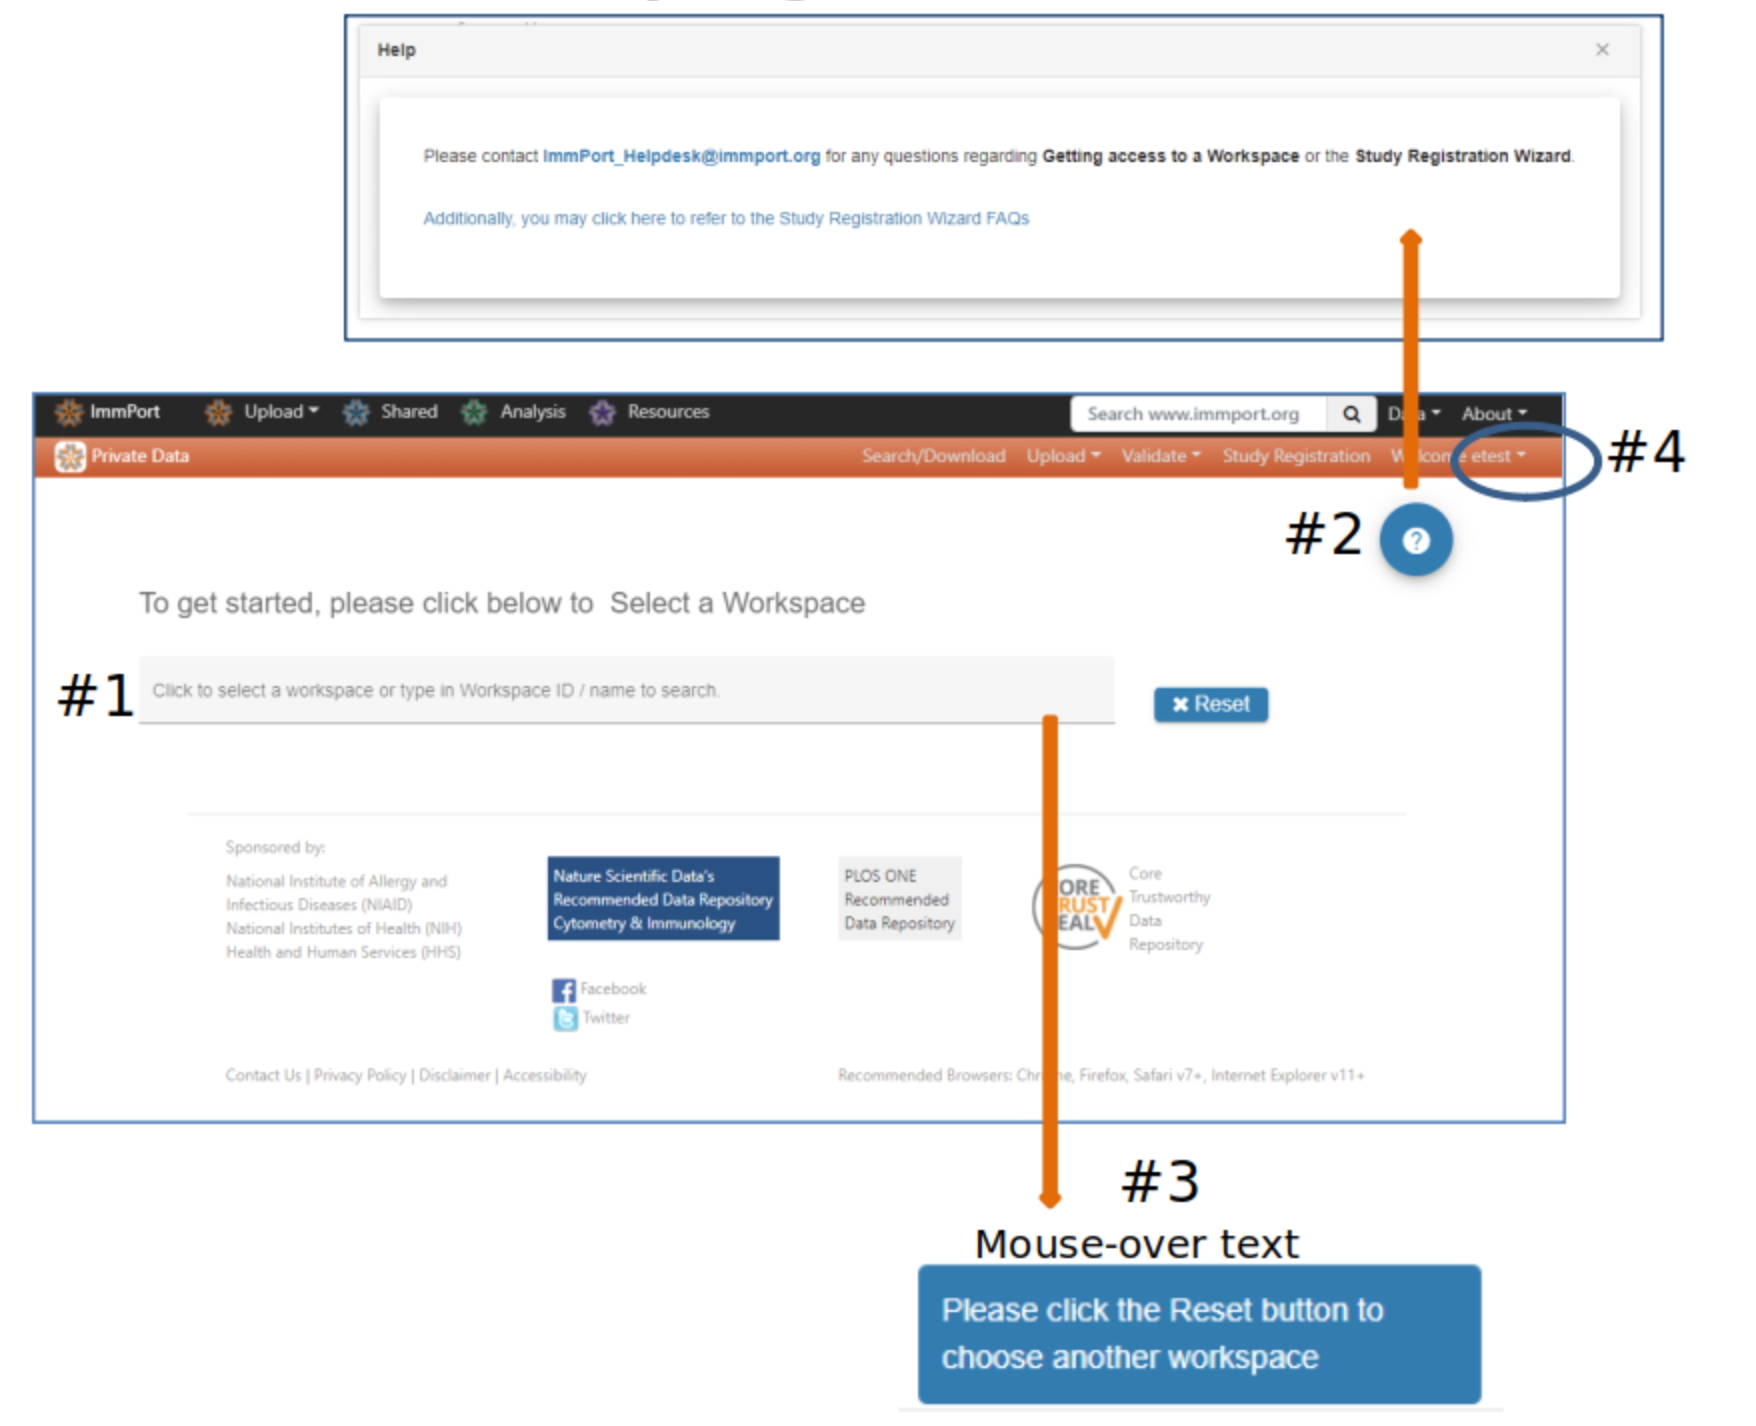
Study Registration Wizard (SRW) home page
#2 Help buttons appear on each webpage and provide useful information and links to assist users with uploading data
#3 Mouse-over fields to see more information or helpful instruction
#4 Your account information
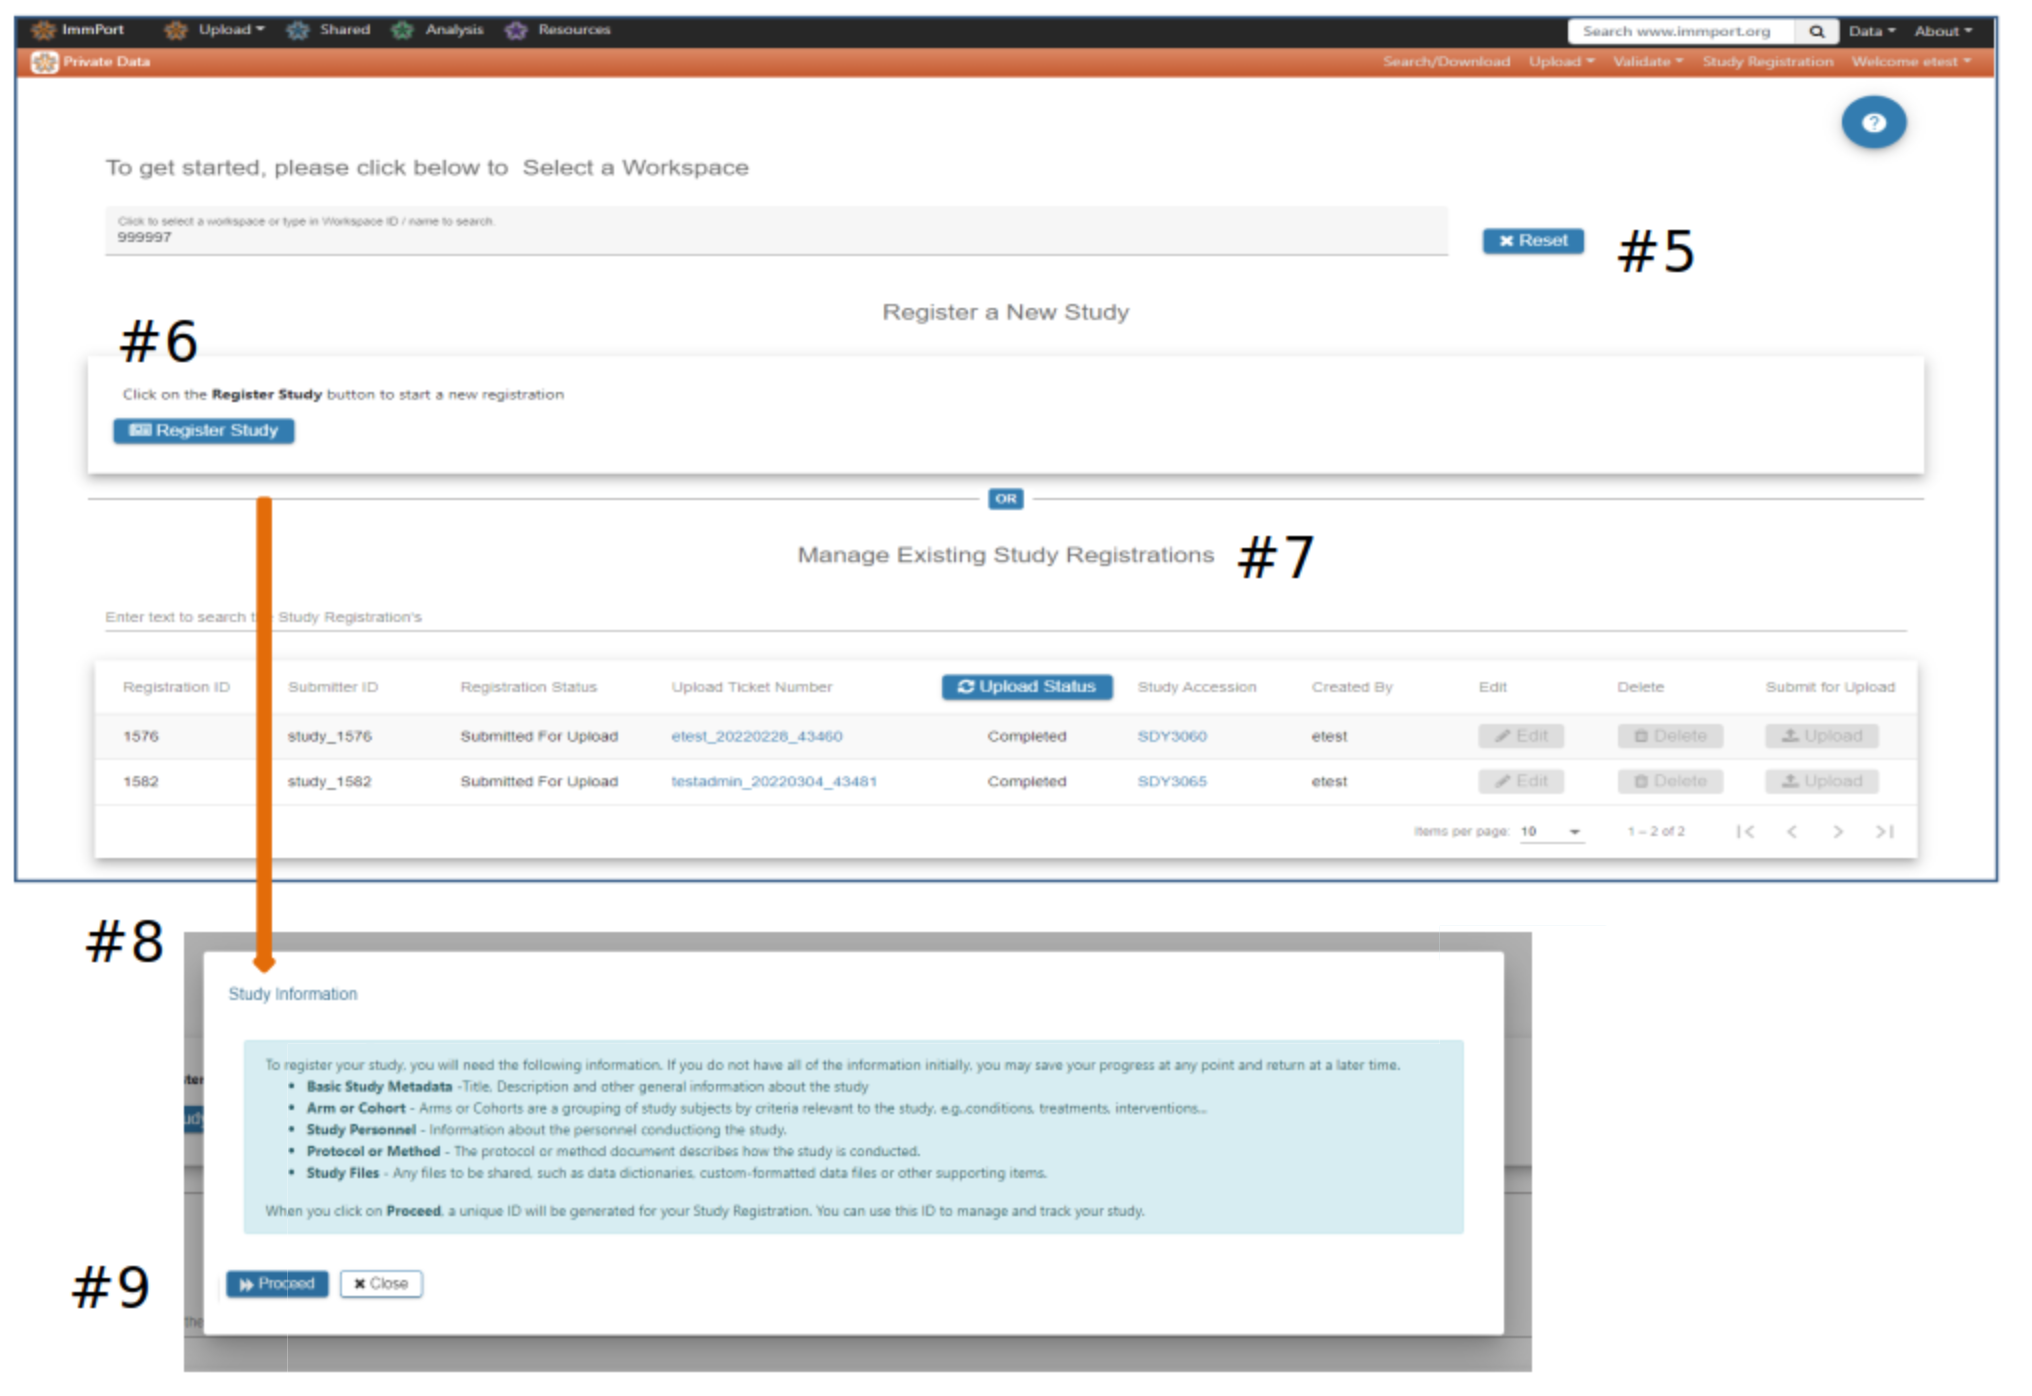
#5 Select a Workspace - If no option is presented please contact the ImmPort helpdesk to be assigned a workspace
#6 Click Register Study to begin the registration and upload process. A pop-up displays information that will be needed to complete the study registration and upload
#7 Studies previously registered via the SRW will appear in the Manage Existing Study Registrations table #8 Register Study pop-up
#9 Select Proceed if you are ready to begin the registration process
Basic info
#2 Basic study information is entered in Step 1. A red asterisk indicates required information
#3 Hover your mouse over the for additional guidance
#4 The Exit, Save and Next buttons at the bottom of each webpage offer the opportunity to return to the initial SRW webpage, save the work or advance to the next page. Exit – pop-up will ask if you want to save the data

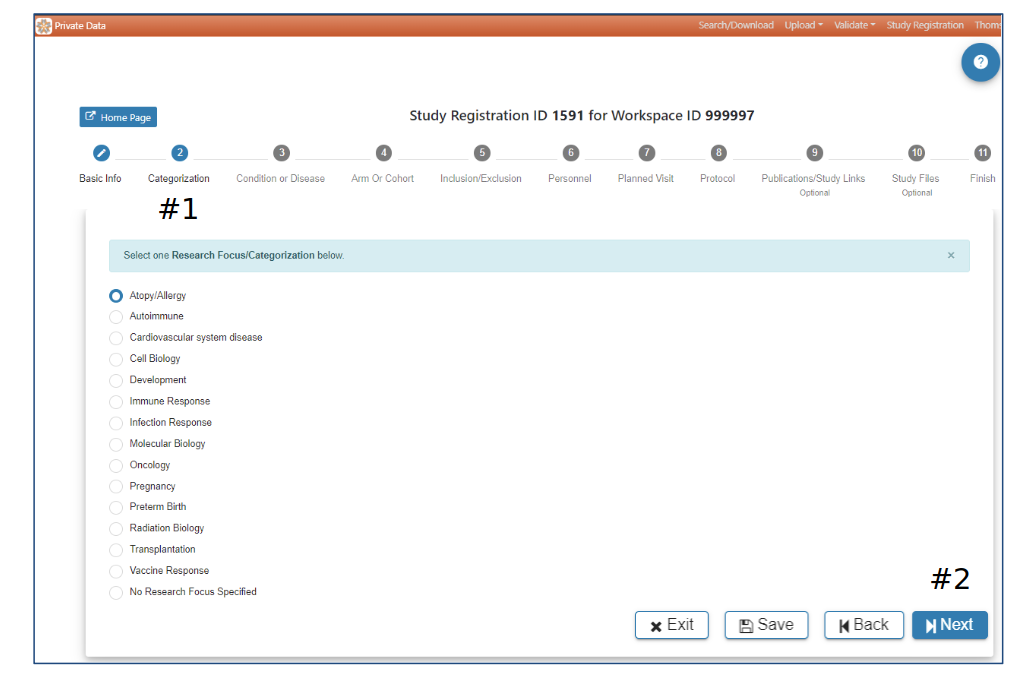
Categorization
#2 Selection of a Research Focus/Categorization is required to advance to the next step. When a selection has been made the Next button will be active
Condition or Disease
#2 Selection of at least one Condition or Disease is required to advance to the next step. The Next button will be active when Condition or Disease has been selected

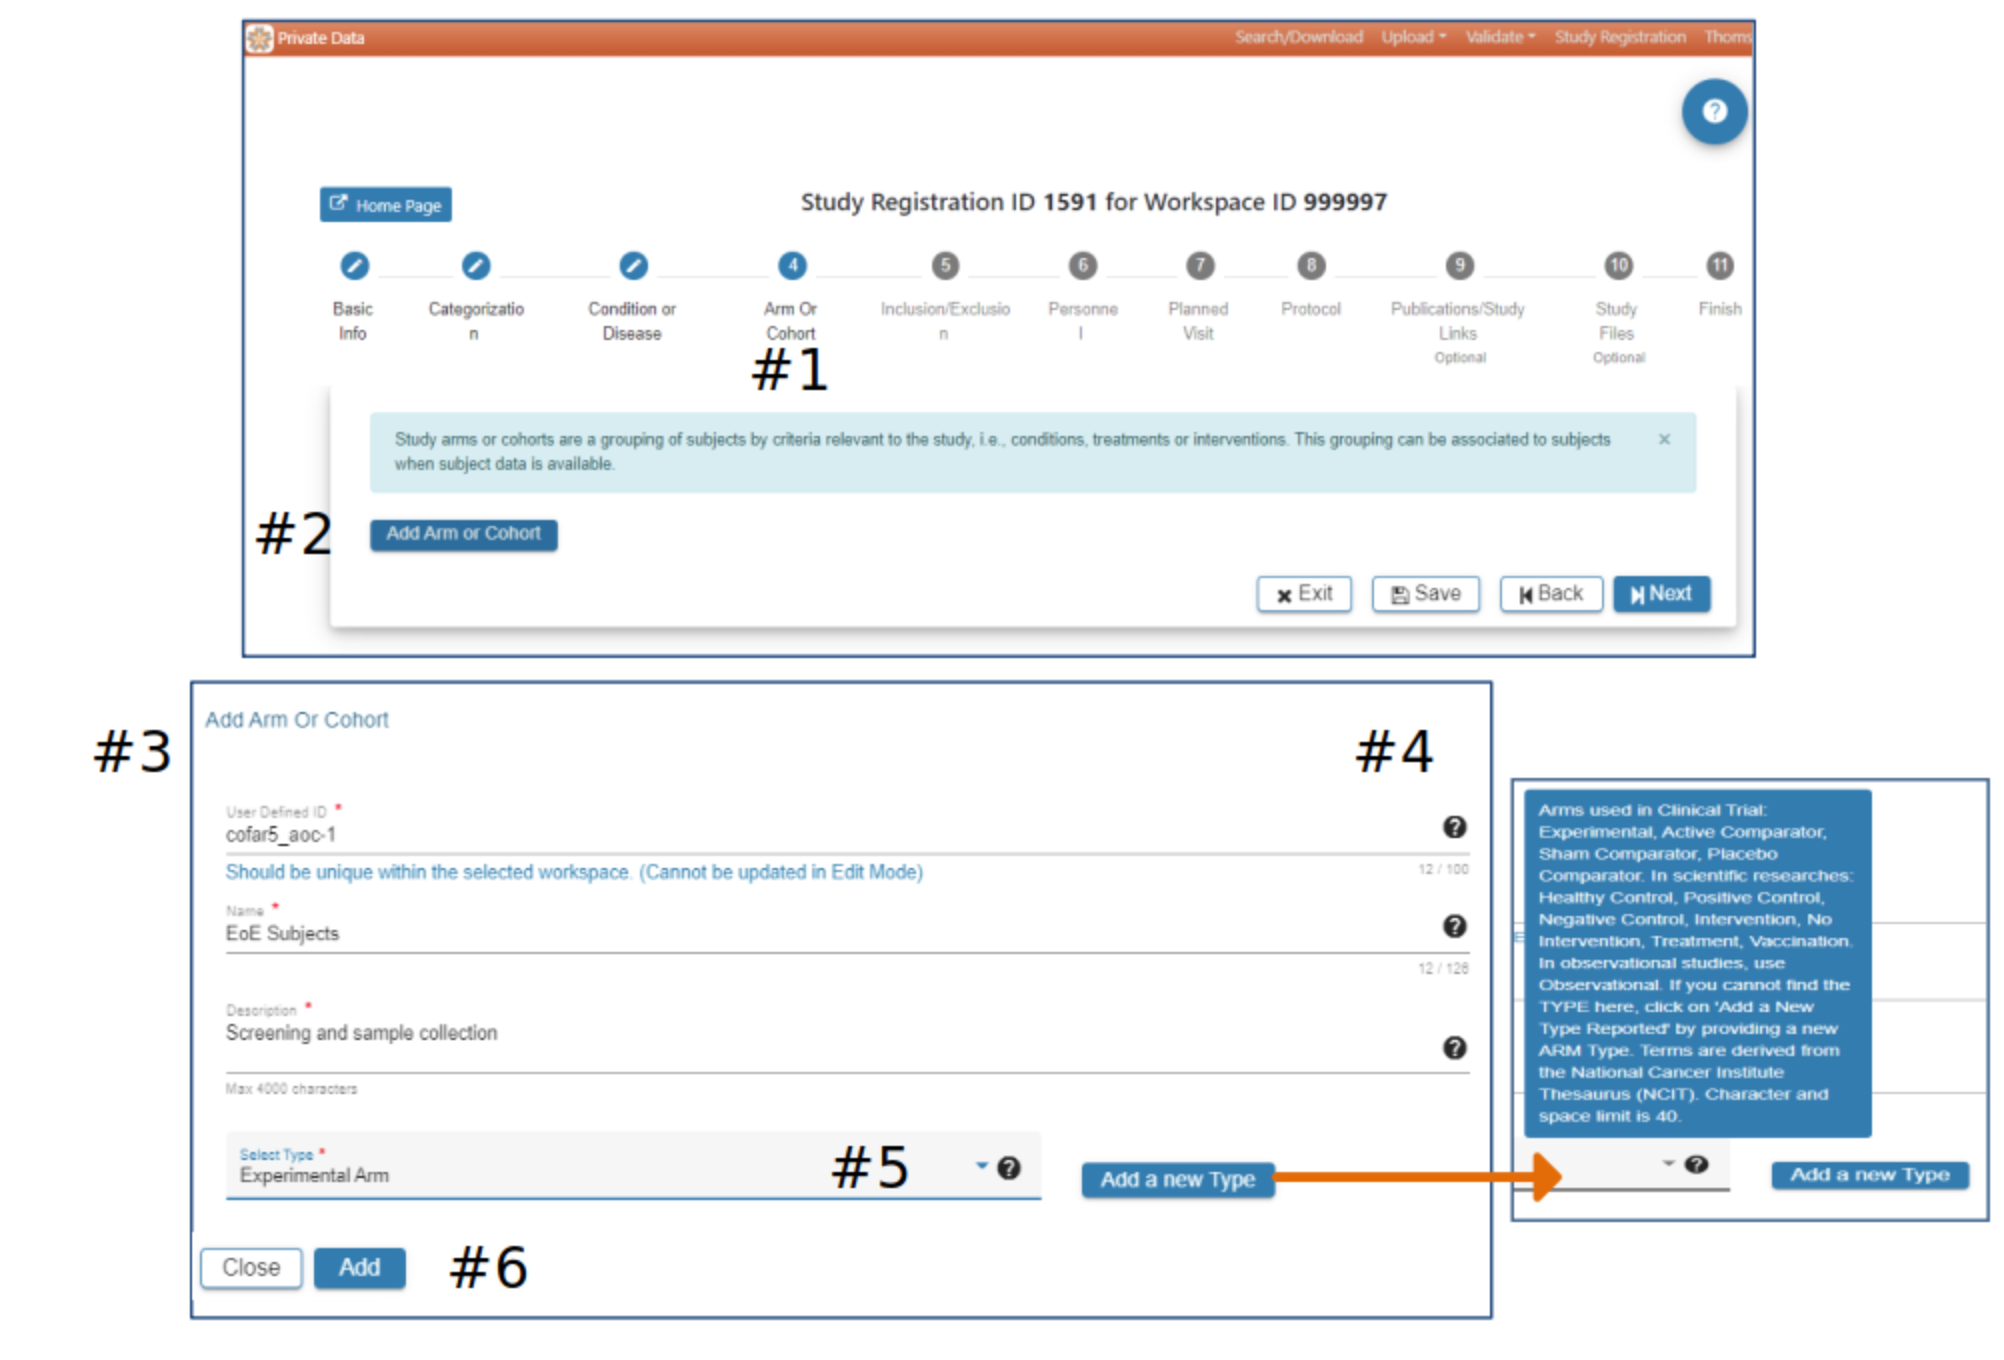
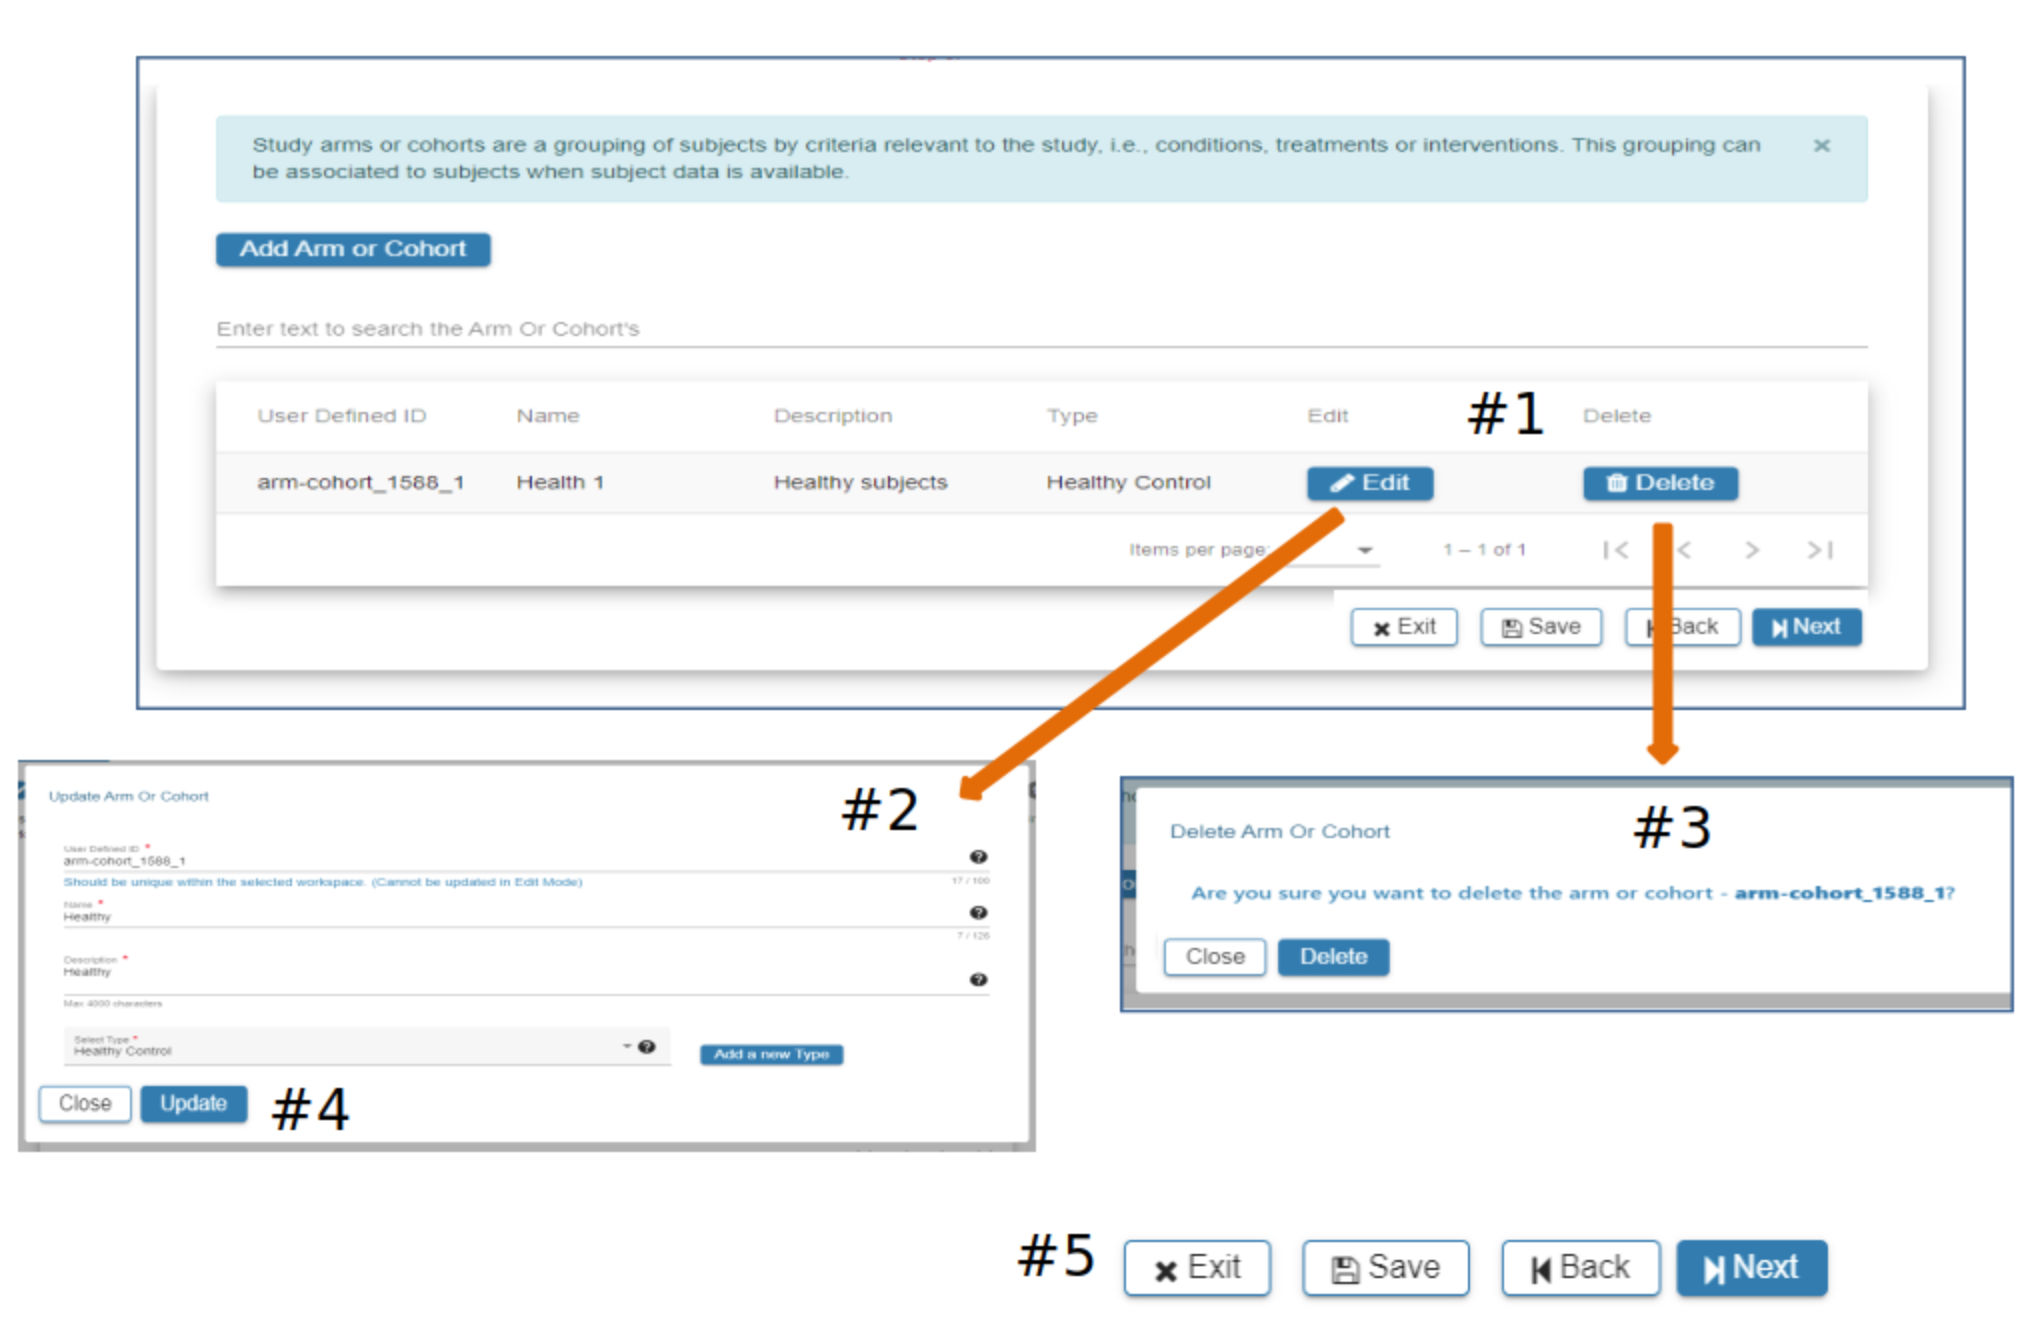
Arm or Cohort
#2 Click Add Arm or Cohort
#3 In the Add Arm or Cohort pop-up complete the required fields. All studies will have at least one Arm or Cohort
#4 Hover over the Question Mark for helpful information about study Arms and which Arm would be appropriate for the Select Type field
#5 Select Add a new Type if available types are not appropriate
#6 When information has been entered in each required field the Add button will be active. Select Add to advance to the next step
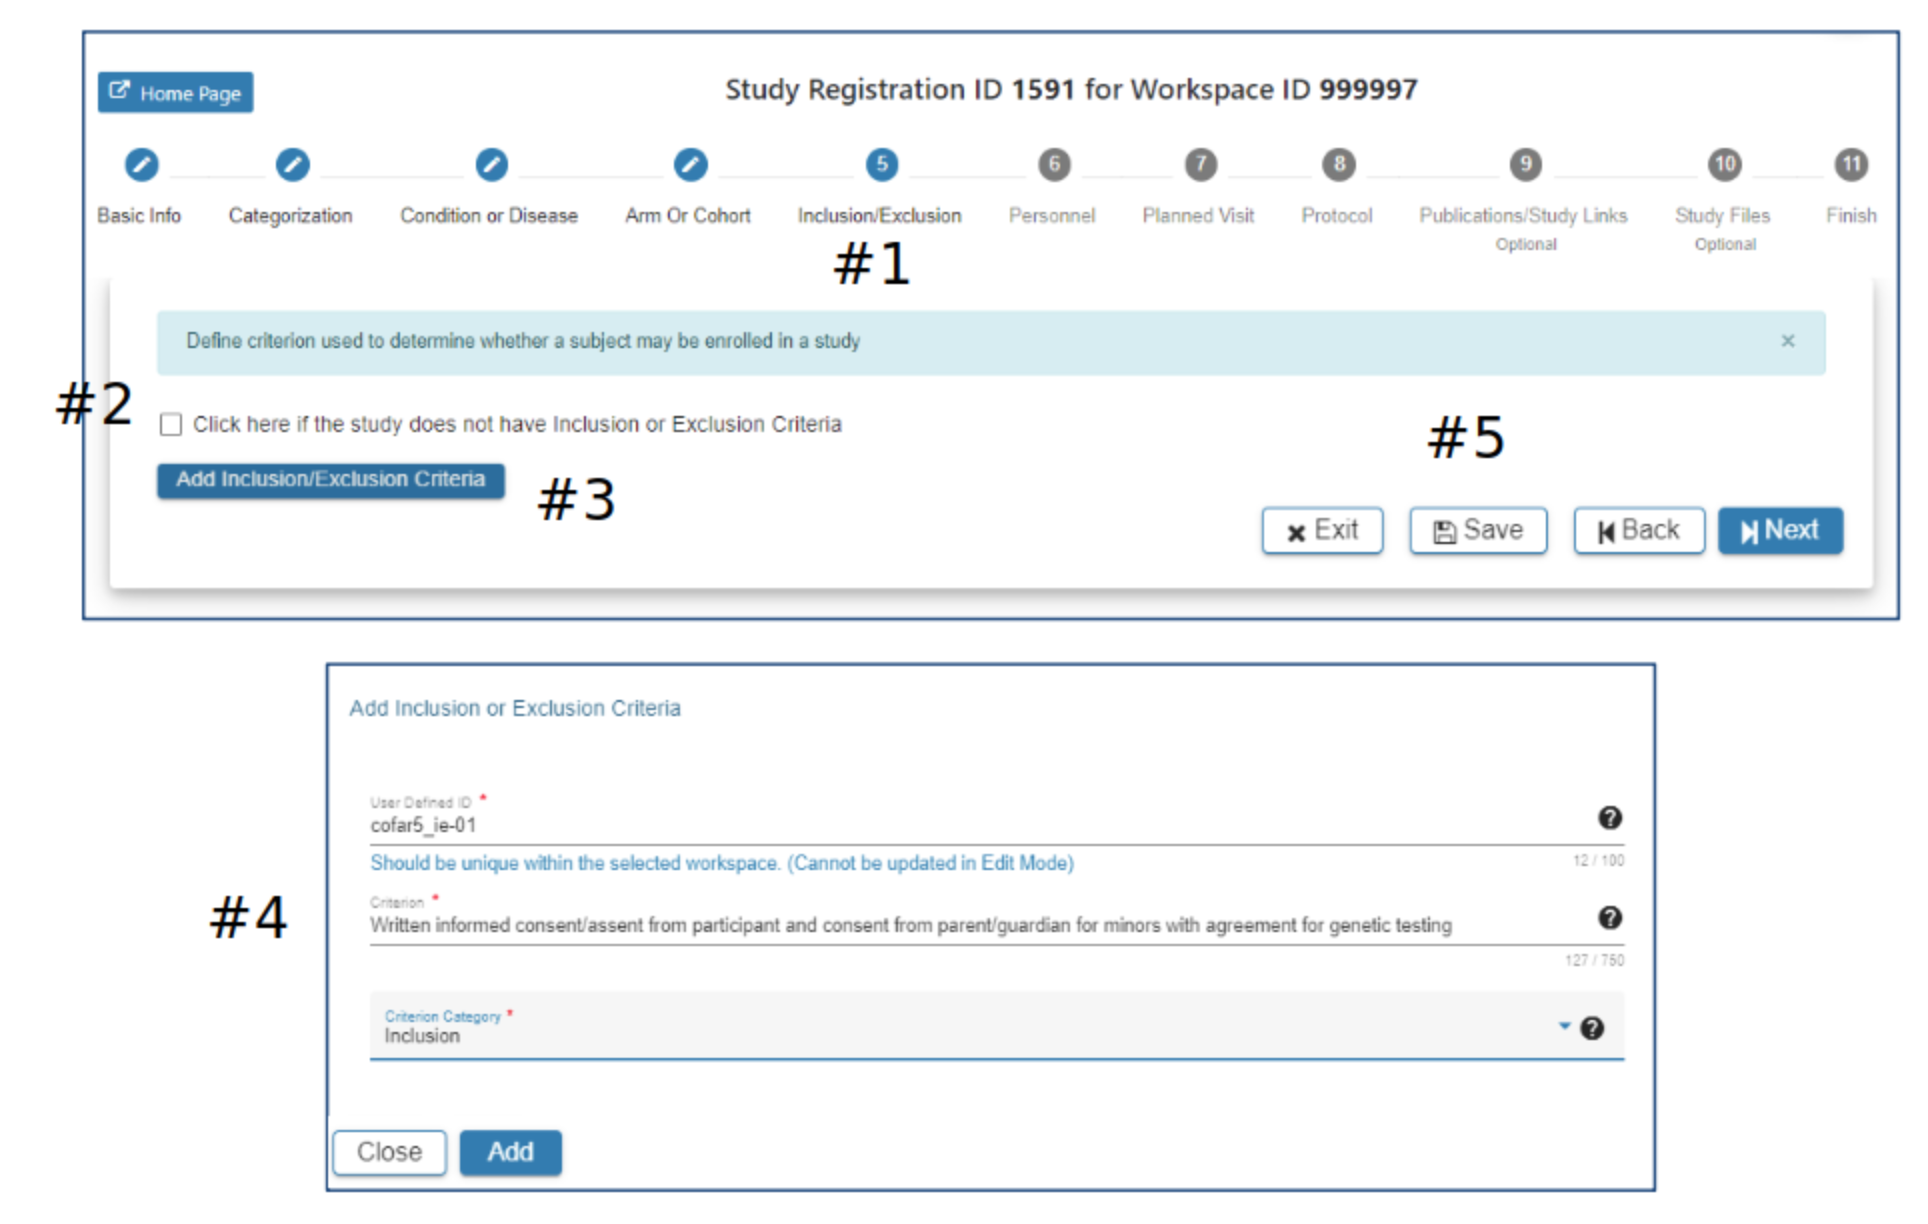
Inclusion/Exclusion
#2 the checkbox can be used to indicate the study has no Inclusion/Exclusion criteria #3 Click Add Inclusion/Exclusion Criteria as appropriate
#4 In the Add Inclusion/Exclusion Criteria pop-up complete the required fields. The Add button will be active when all required fields have data entered
#5 Select Exit, Save, Back or Next as needed
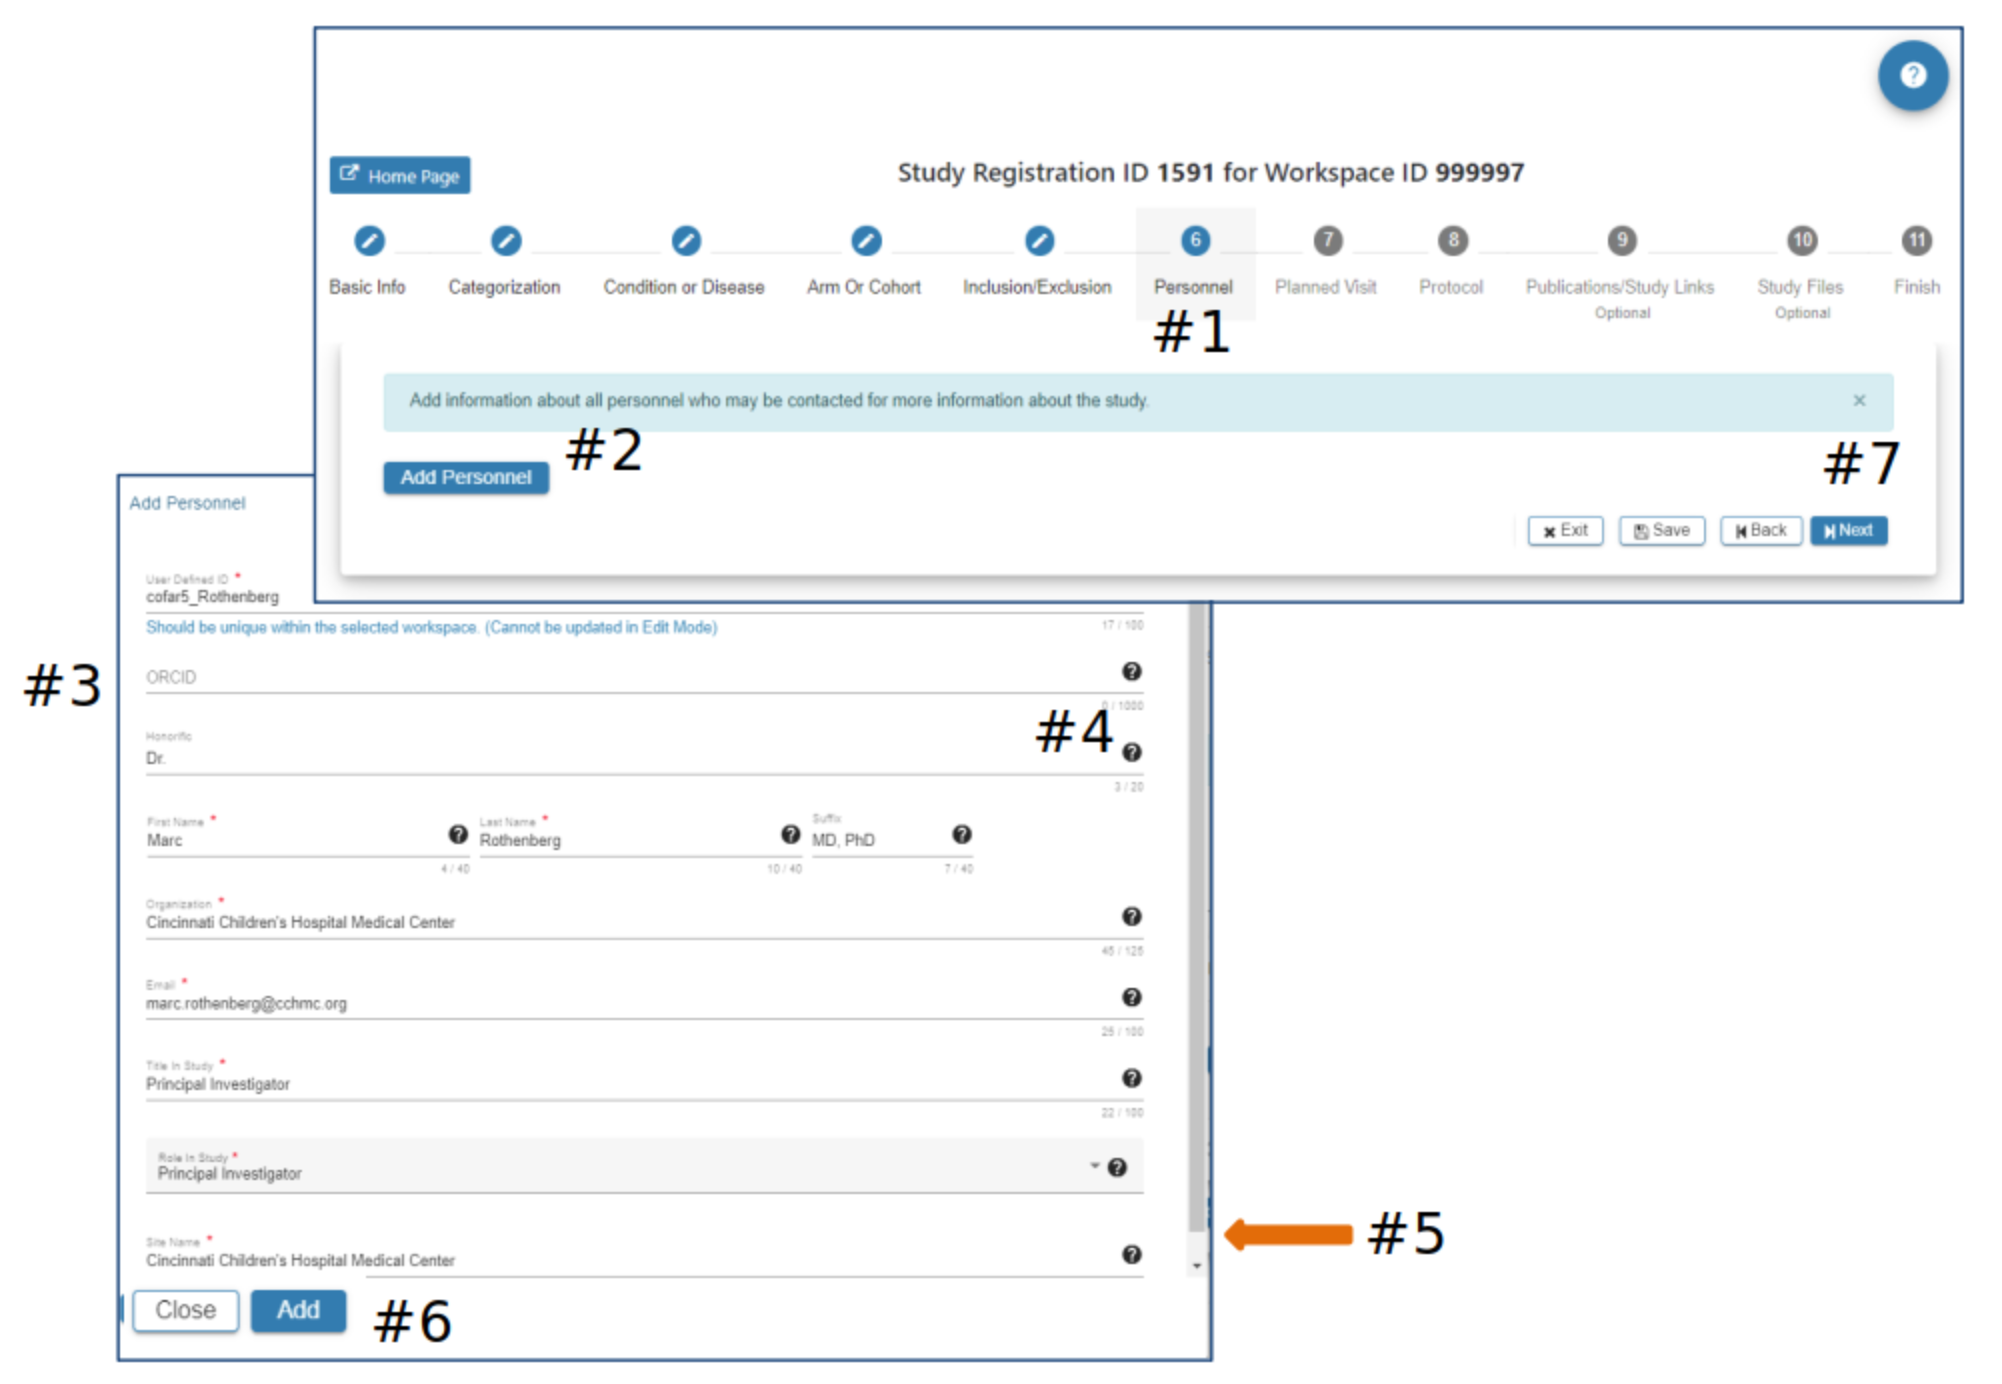
Personnel
#2 Select Add Personnel
#3 In the Add Personnel pop-up complete the required fields
#4 Hover your mouse over the for additional guidance
#5 Scroll down to ensure all required fields are entered
#6 The Add button will be active when all required fields have data entered
#7 Select Exit, Save, Back or Next as needed
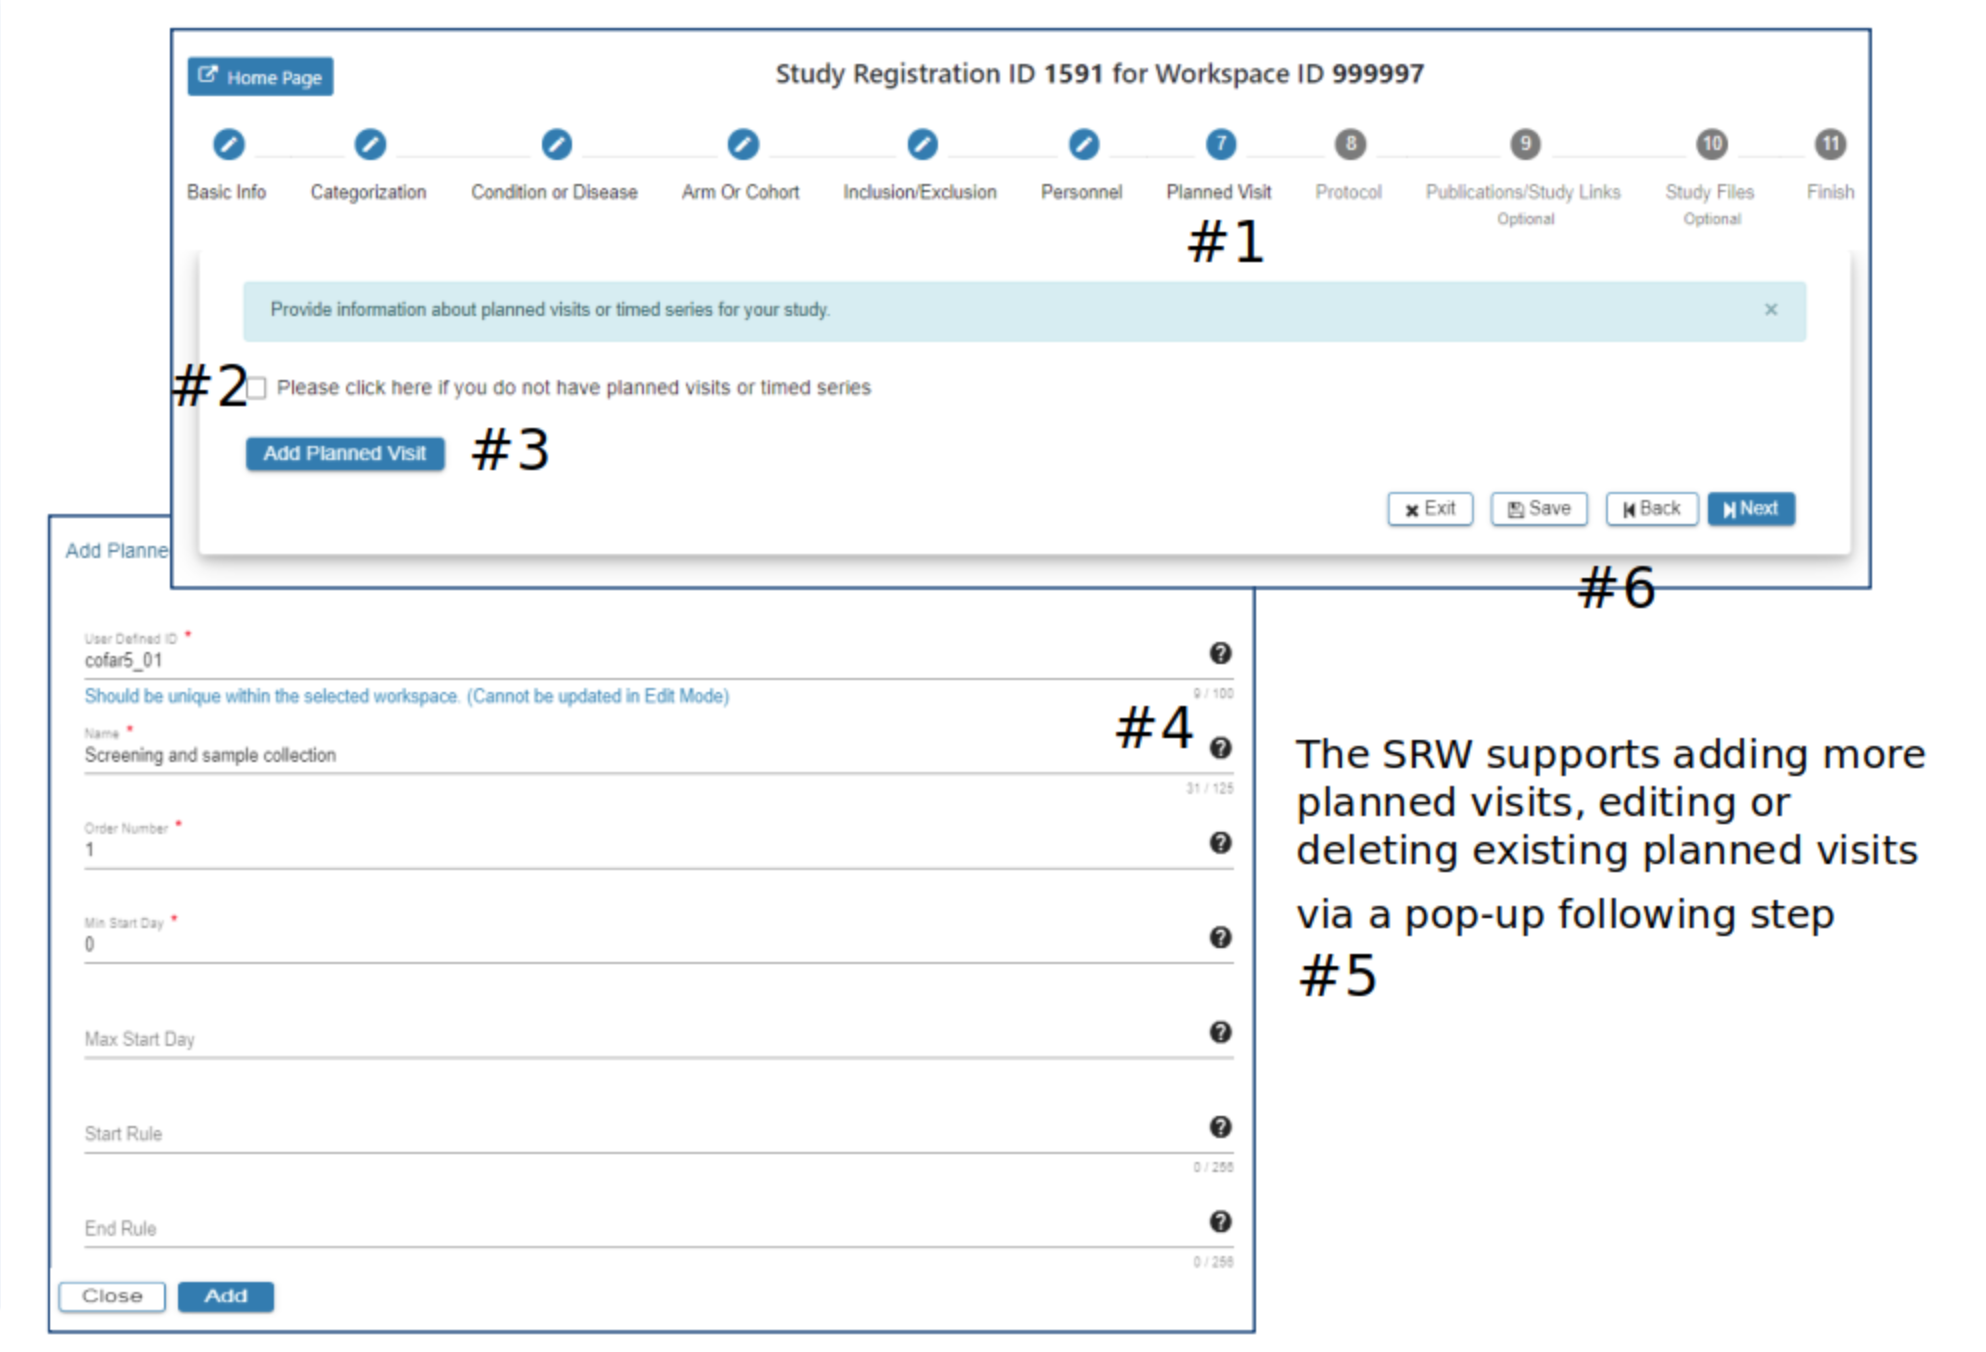
Planned Visit
#2 Click the checkbox if planned visits is not applicable to the study
#3 In the Add Planned Visit pop-up complete the required fields
#4 Hover your mouse over the for additional guidance
#5 The Add button will be active when all required fields have data entered
#6 Select Exit, Save, Back or Next as needed
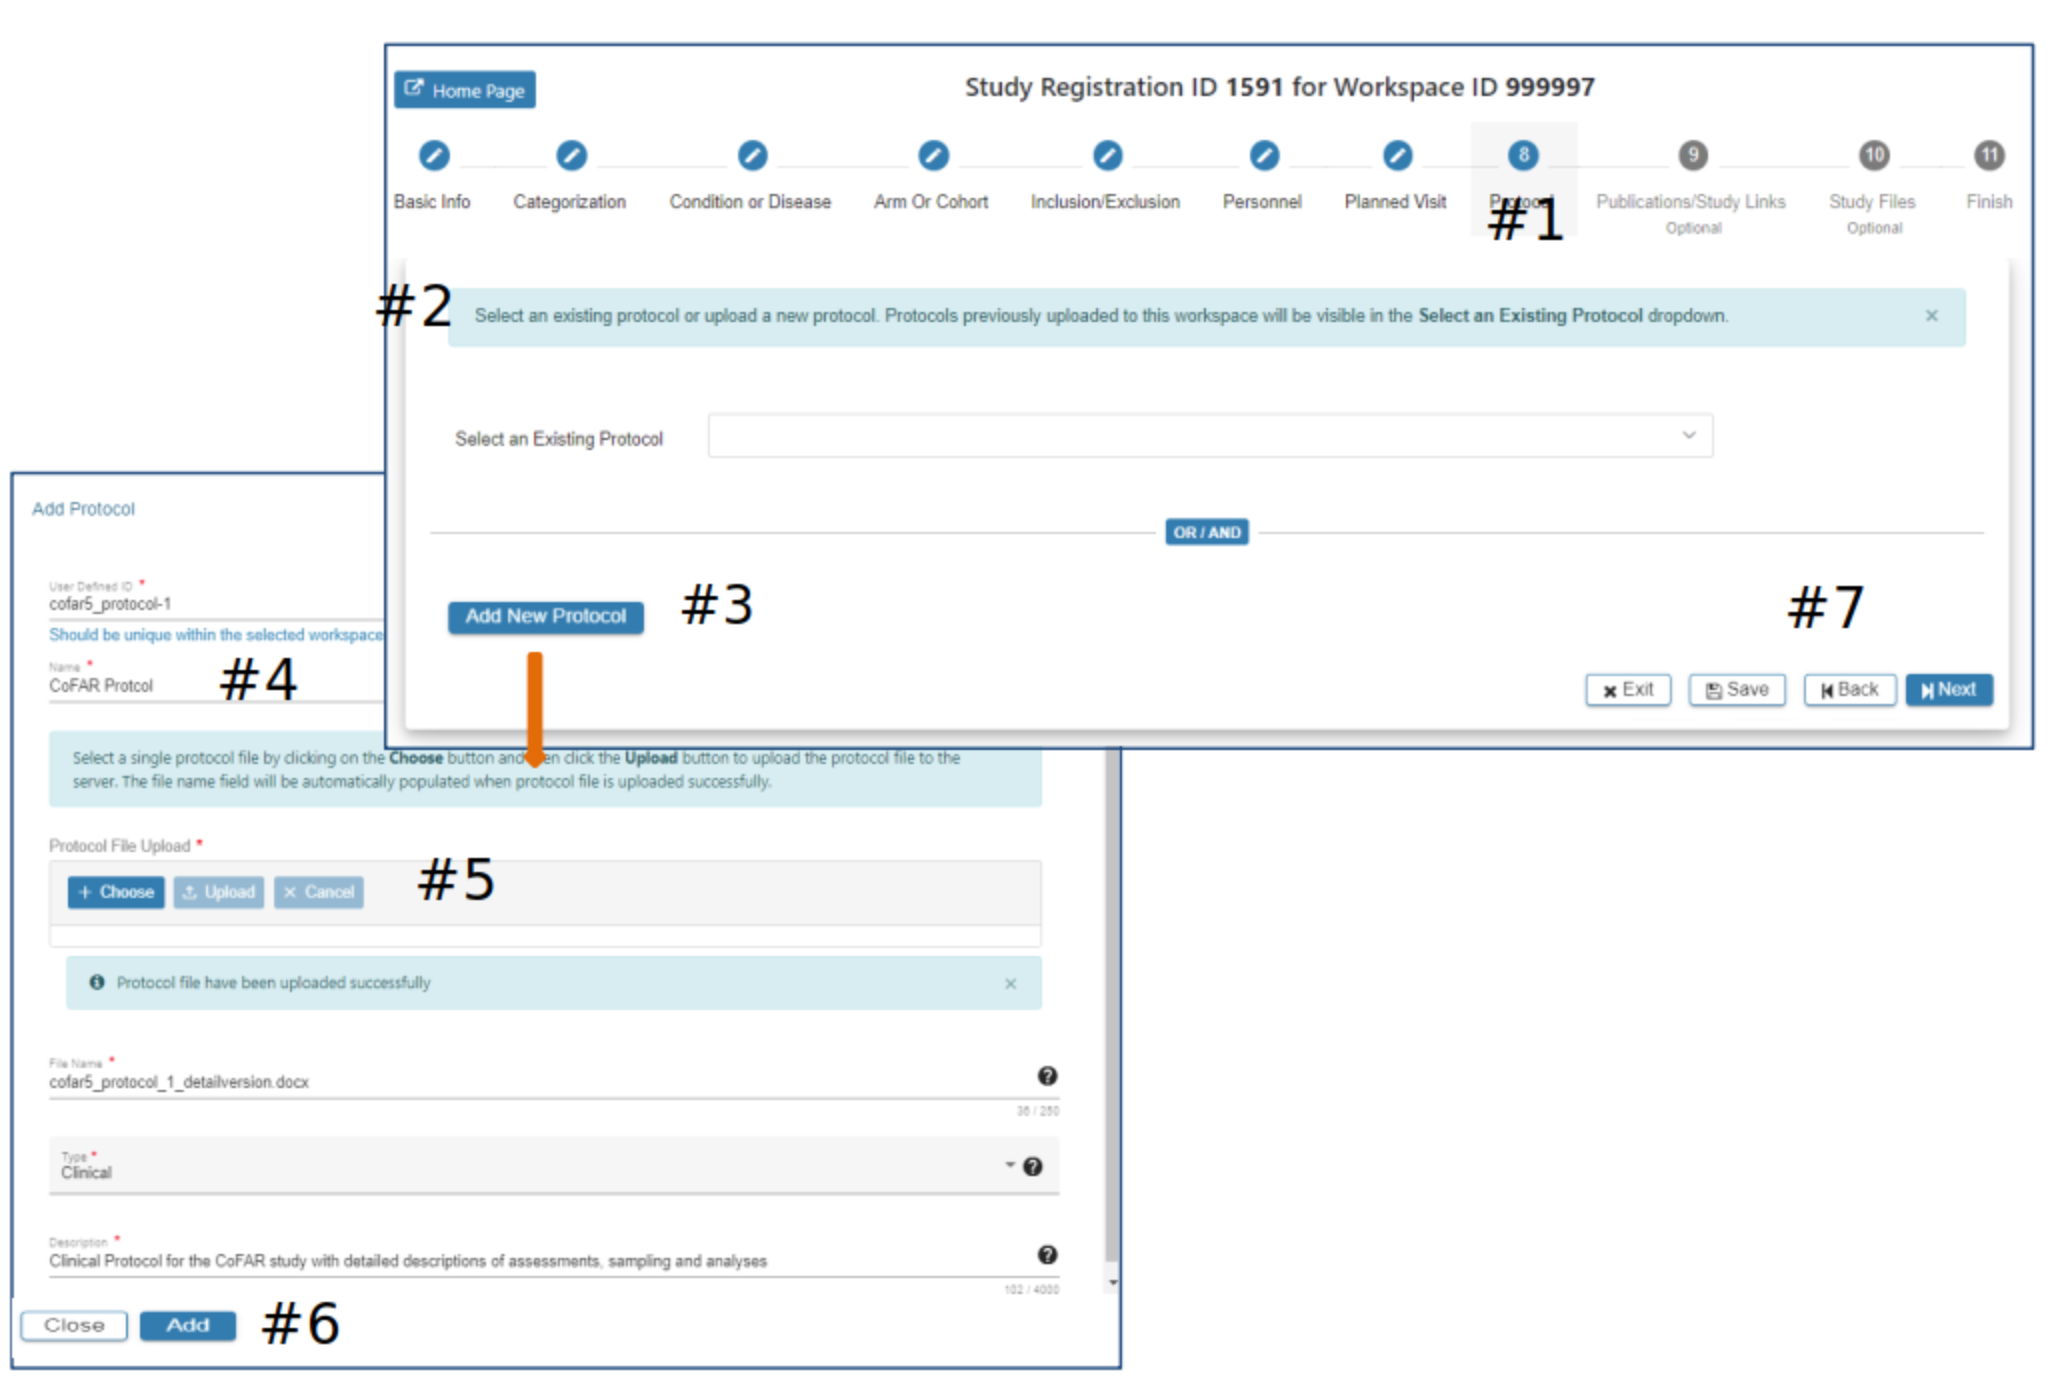
Protocol
#2 If a protocol has been previously uploaded via the SRW it will appear as an option to select, as appropriate. Or…
#3 Select Add New Protocol
#4 Enter data in the required fields (*)
#5 Select the appropriate protocol file to be included with this study
#6 The Add will be active when all required data fields have data entered. Click Add
#7 Select Exit, Save, Back or Next
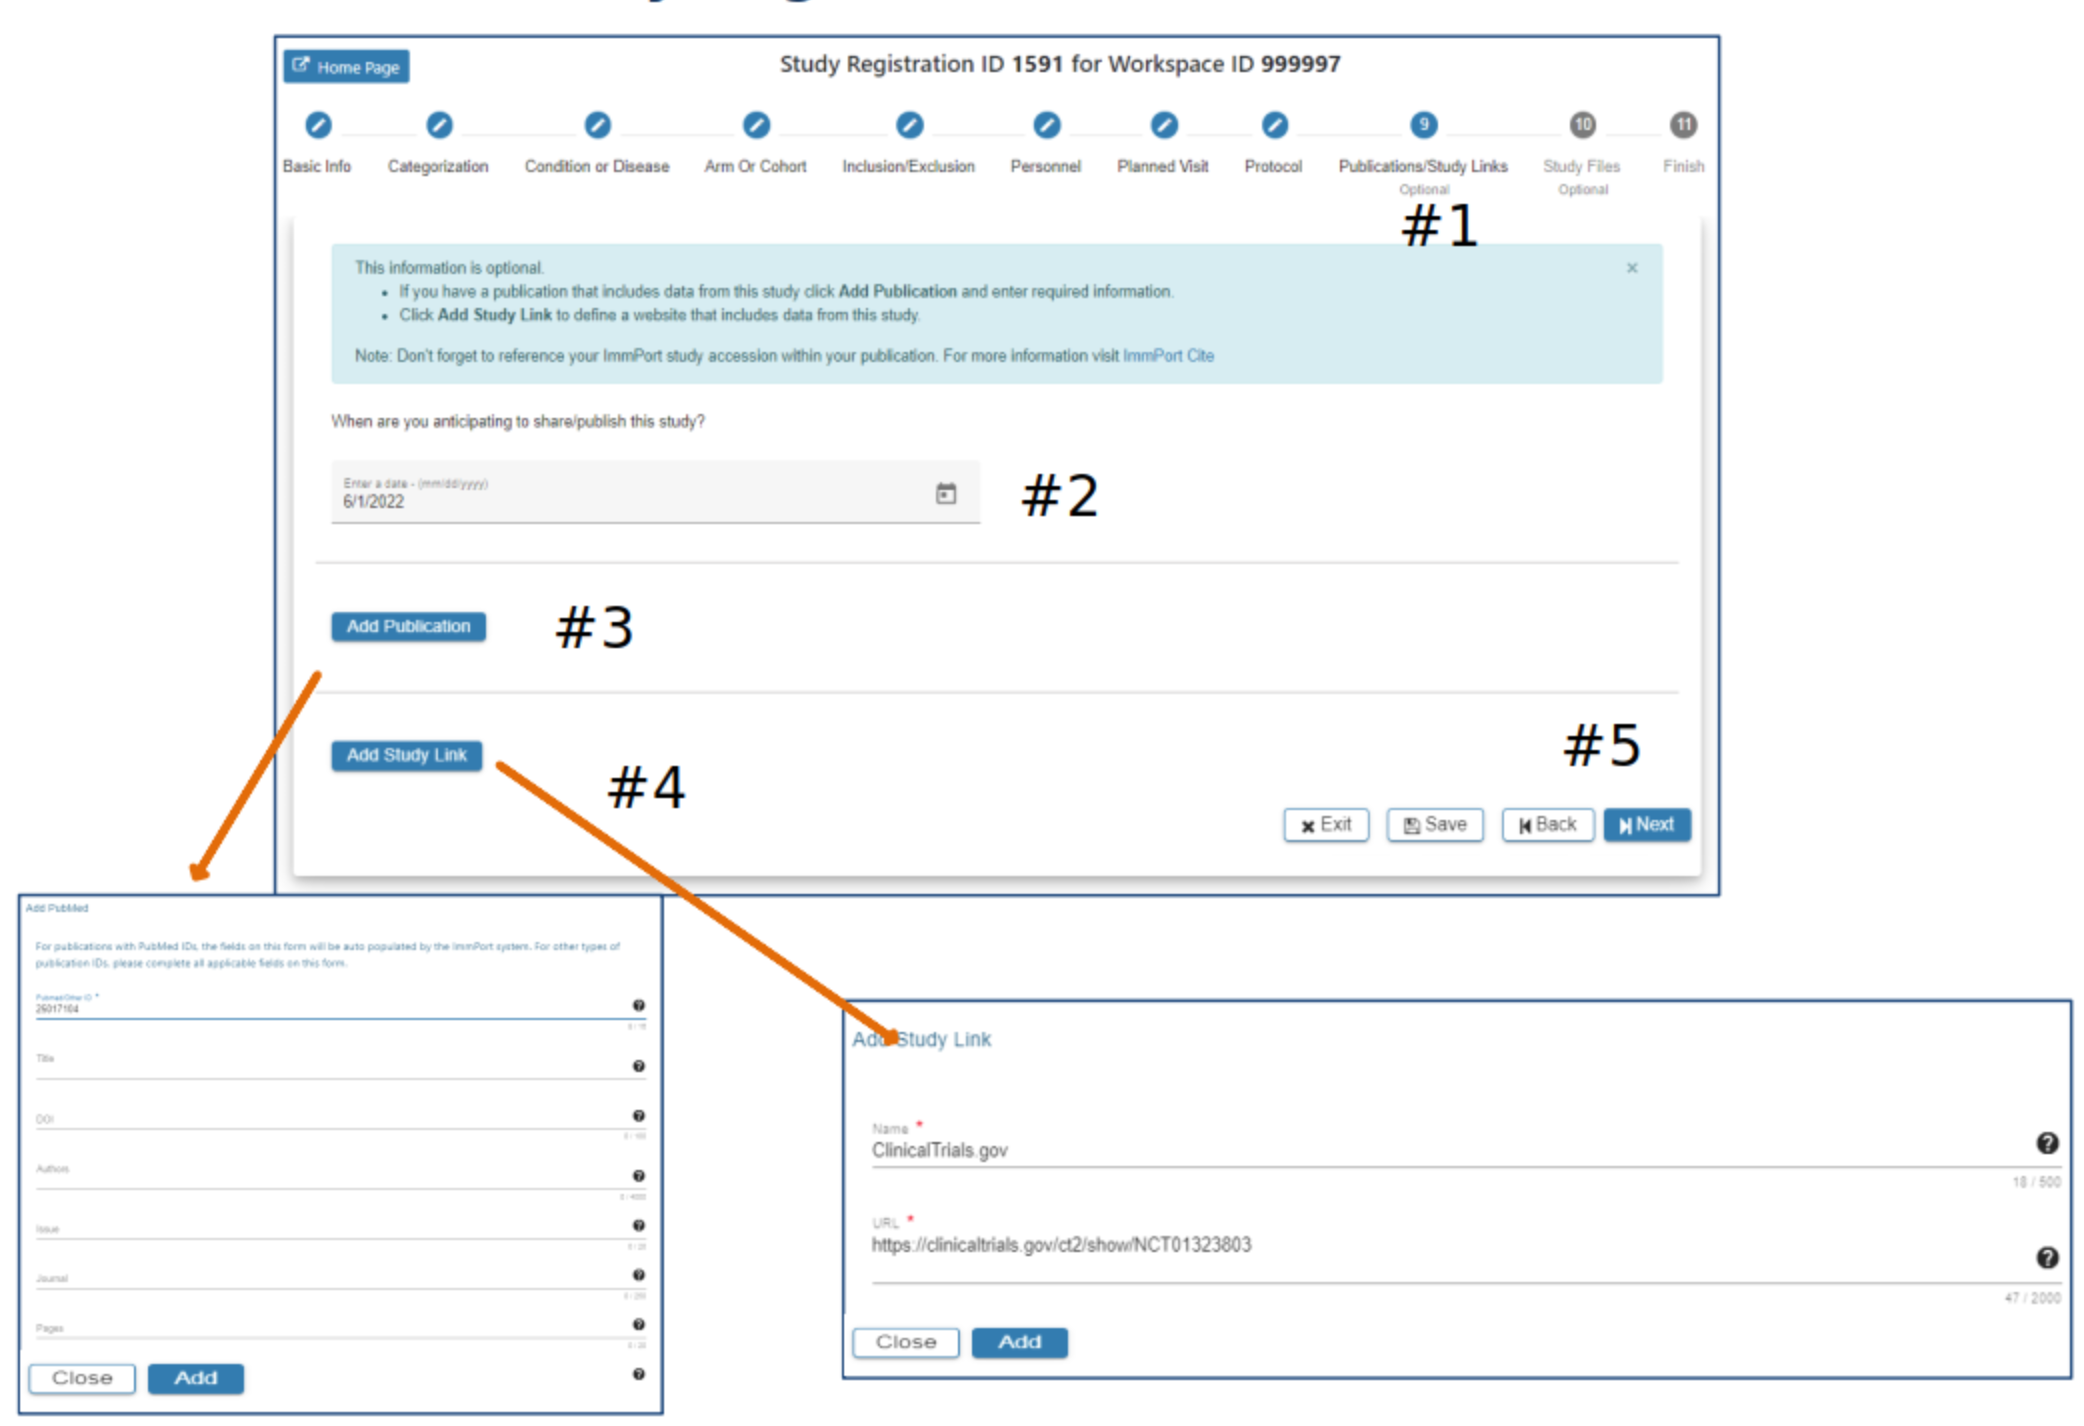
Publications/Study Links
#2 Select a date when you anticipate sharing your study
#3 Select Add Publication. Complete appropriate information in the Publication pop-up. The Add button will be active when all required fields have data entered. Click Add
#4 Select Add Study Link and complete required fields. Click Add
#5 Select Exit, Save, Back or Next as needed. The SRW supports editing Publications and Study Links once the data has been entered and prior to submission
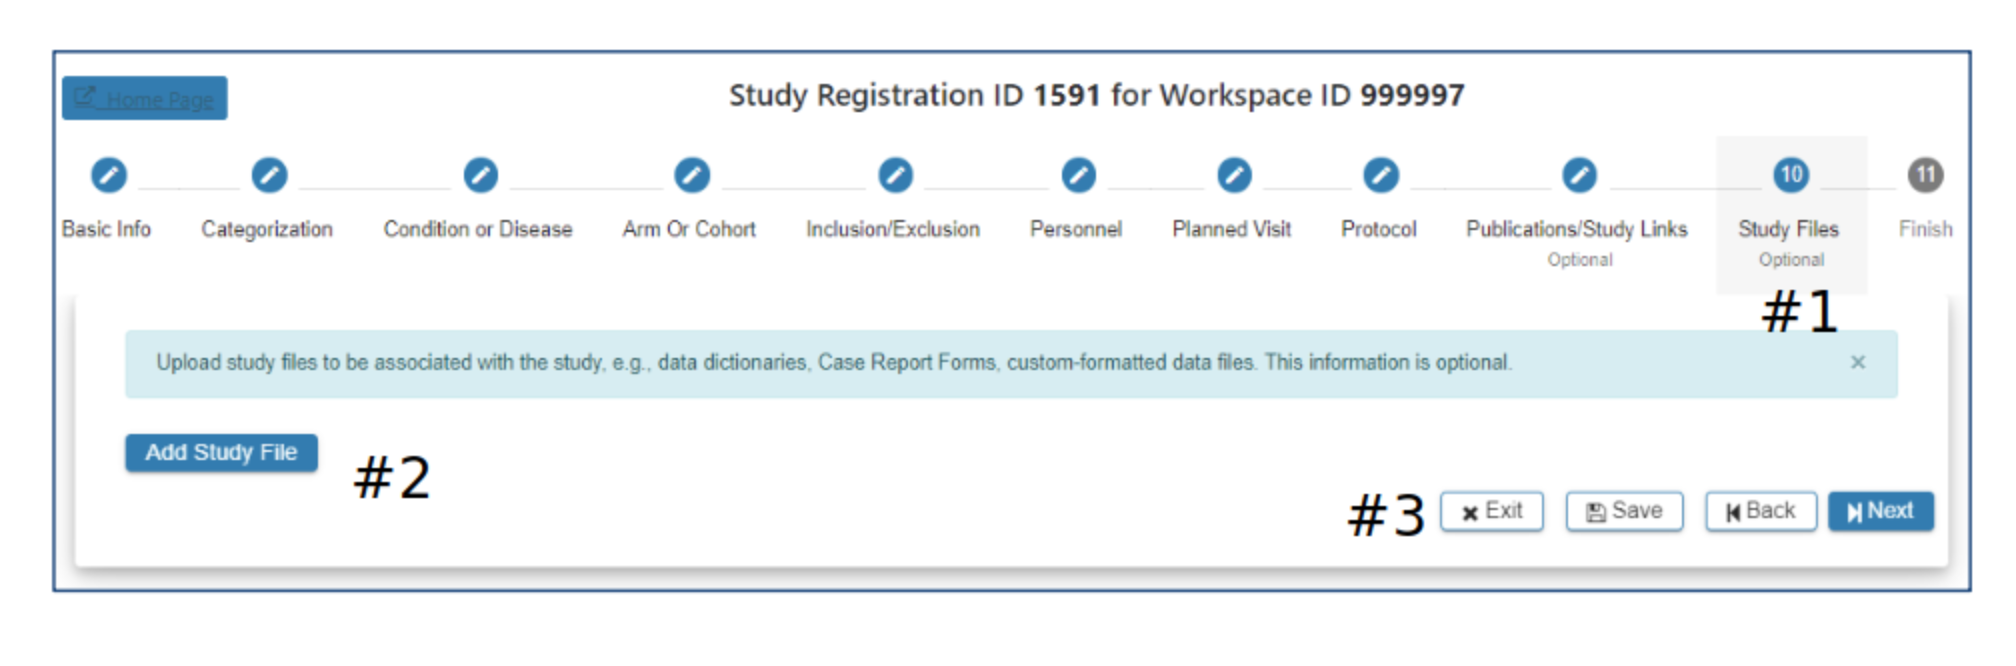
Study File
#2 Select Add Study File if you would like to include additional study data for upload. Additional data can be custom-formatted data files, data dictionaries, case report forms (.txt, .xlsx, .pdf…) If you have questions about other types of data please contact the ImmPort helpdesk: ImmPort_Helpdesk@immport.org
#3 Select Exit, Save, Back or Next as needed
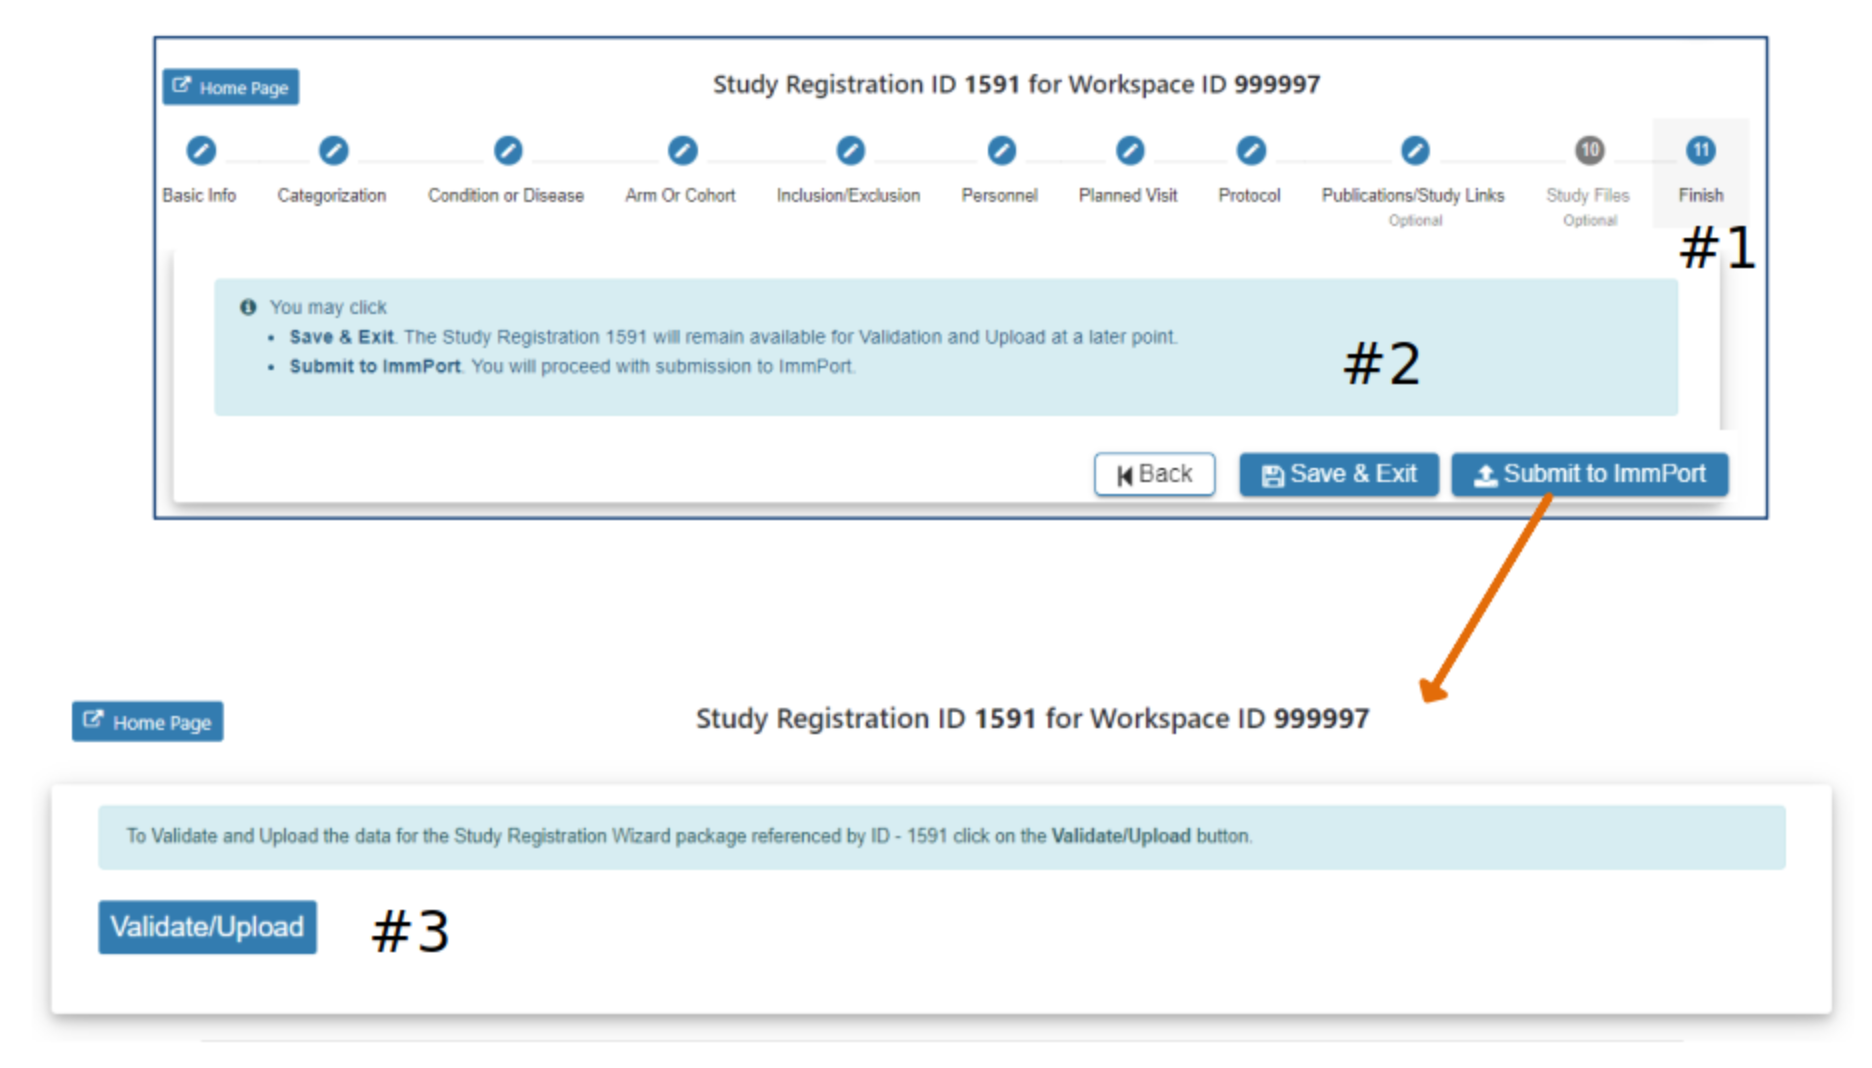
Validate and Upload
#2 Select Submit to ImmPort to proceed with submission to ImmPort
#3 Selecting Validate/Upload will place your study and associated files in the queue for Validation. When successfully validated the study will be submitted to ImmPort.
Please contact the ImmPort helpdesk if you have questions or feedback you would like to share: ImmPort_Helpdesk@immport.org
Submission Status
- Definition of Pending, Completed, and Rejected
- How to see the new study in ImmPort
- How to access the Rejected upload ticket for more details about why the upload was rejected
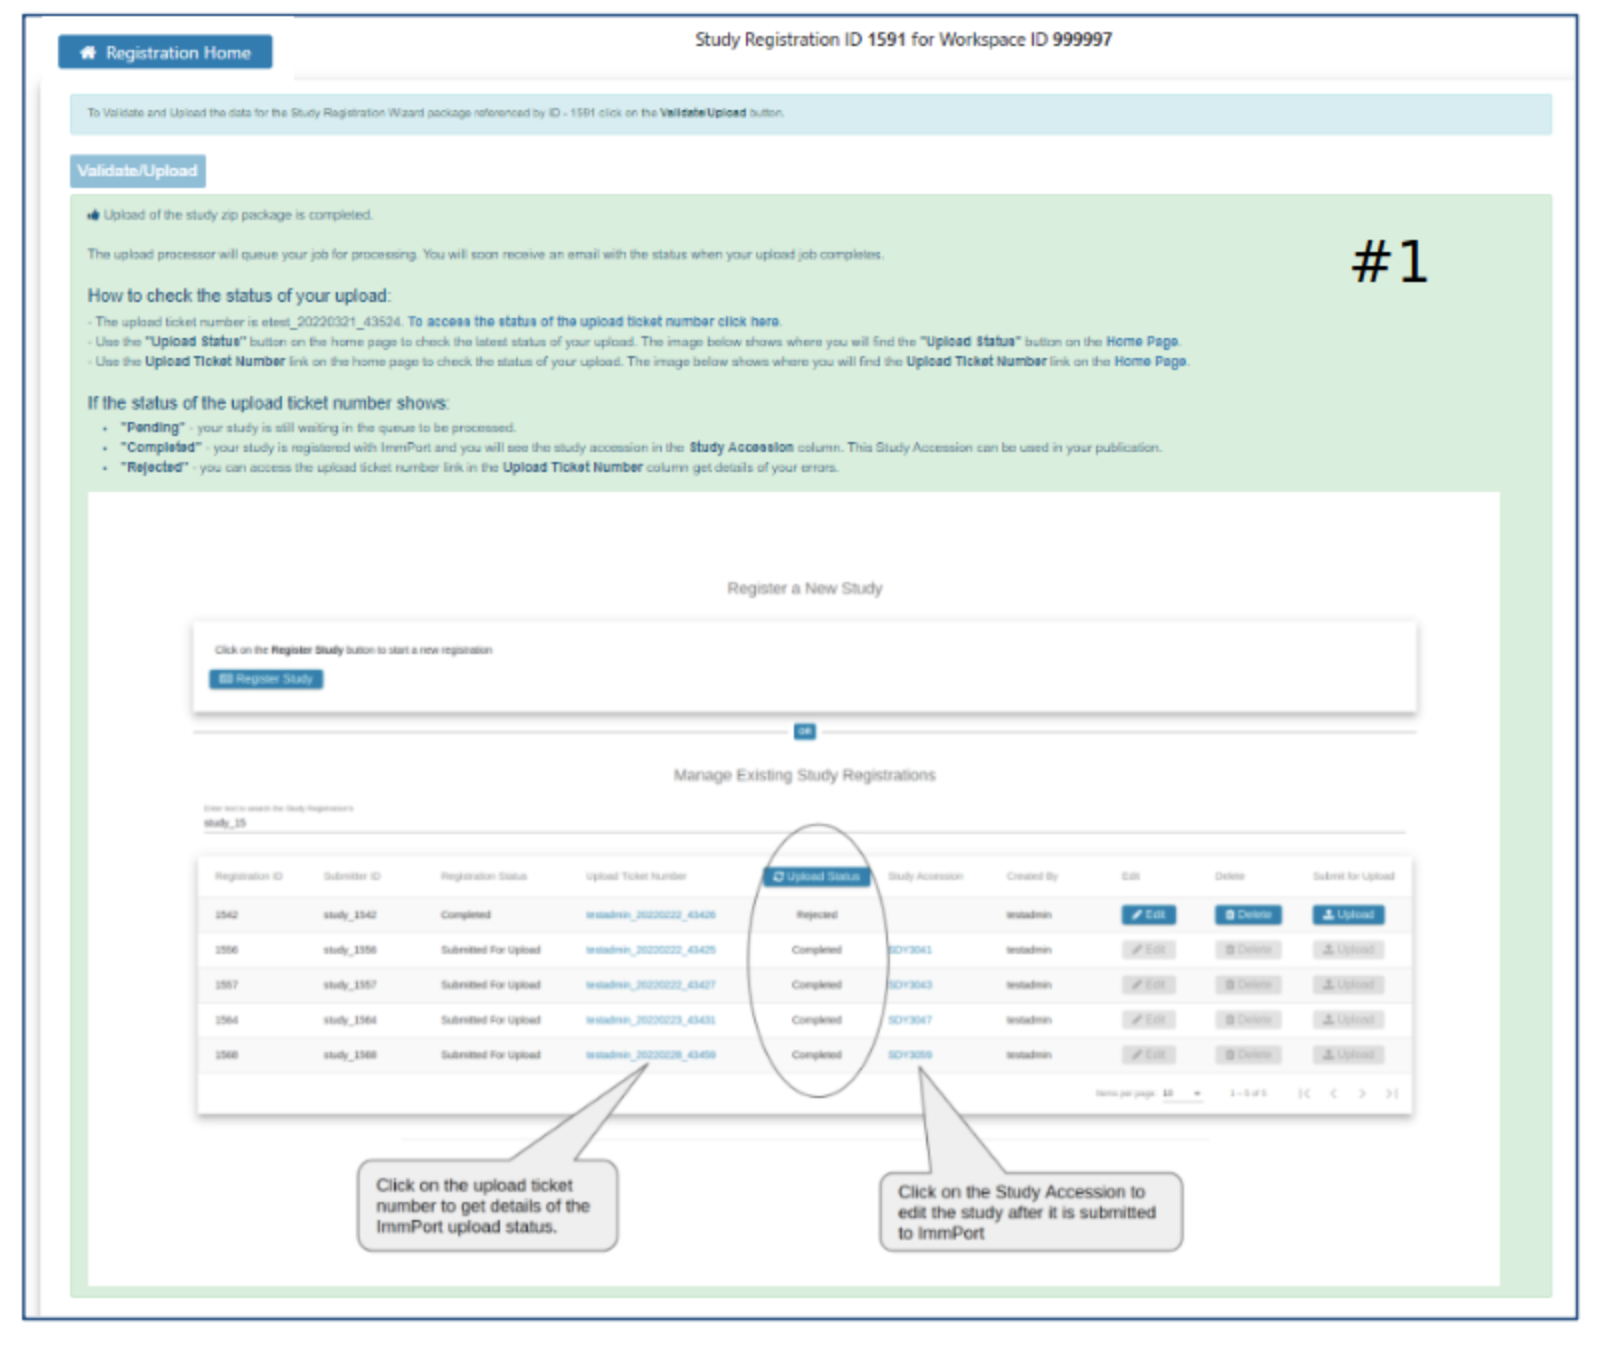
The SRW will send, via email to the email account used in your registration, an upload status message with downloadable reports
Please contact the ImmPort helpdesk if you have questions or feedback you would like to share: ImmPort_Helpdesk@immport.org
Editing Content
#4 Select Update when edits have been completed
#5 Use the buttons at the bottom of the webpage to
- Exit – asks whether to save and returns user to initial SRW webpage
- Save – saves data
- Back – navigate to previous webpage
- Next – navigate forward
Tutorial Links
PDF and Powerpoint versions of the tutorial content of this page are available here:
FAQ
-
What is meant by a ‘study’? A study is a collection of data generated based on a research or clinical study protocol. A study may be focused on data referenced in a manuscript and would be sufficient for the data consumer to fully understand the conclusions presented in the manuscript and conduct a reanalysis with similar results.
-
Am I required to use the Study Registration Wizard to upload my data? Data providers are not required to use the Study Registration Wizard. The Study Registration Wizard is a tool designed to assist data providers with data loading. The basic_study_design.txt template and the protocol.txt template can be used to upload the same information as the Study Registration Wizard.
-
Who has access to my workspace? Workspaces are private and assigned to a user by ImmPort staff. You inform ImmPort staff who should have access to your workspace. ImmPort staff may access your workspace as needed.
-
Can I add or remove people from my workspace? Yes, if you are an Administrator for a workspace, you may edit users who have access to it. Please see Workspace User Management for more details.
-
One or more Research Focus/Categories defines my study but I cannot select more than one, what should I do? Please contact the ImmPort helpdesk (ImmPort_Helpdesk@immport.org) for assistance in linking your study to more than one Research Focus/Category.
-
My manuscript is being drafted and I don’t have the final title, journal or publication ID, what should I do? Publication information can be updated after a study has been submitted by using the study_design_edit.txt template. Please contact the ImmPort helpdesk(ImmPort_Helpdesk@immport.org) for assistance.
-
Can I edit fields after my study has been submitted? Edits are possible by using the study_design_edit.txt template followed by validation and loading through the ImmPort upload process. In the future, the Study Registration Wizard will support updating existing uploaded studies.
-
How long does Validation and Submission take? Validation and Submission may take anywhere from five minutes to much longer depending on the volume and complexity of data loaded.
-
How soon can I see my study in ImmPort? You should be able to view your successfully validated and loaded study in ImmPort within 5 minutes of receiving the email notifying you of the successful upload.
-
How are the User Defined ID fields used? User Defined IDs, loaded to ImmPort by data providers, are not publicly shared. ImmPort generates ImmPort accessions to replace User Defined IDs. Only the data provider and others with access to the data provider workspace can see the User Defined IDs.
-
Can I change the pre-populated values for the various User Defined ID fields? Yes, you may change the User defined IDs to anything that makes sense for your personal tracking needs, however, the ID must be unique and not already in use within the workspace. The pre-populated value is just a suggestion.
-
When entering personnel, what is the difference between the Title in Study and Role in Study fields? Title in Study refers to the position personnel play as defined by the research team. This field is free text. The Role in Study field provides a dropdown menu to select. Personnel may have the same Title and Role in the study. Personnel listed as PI via the dropdown will appear in the ImmPort user interface.
-
When adding an existing protocol, can I view or edit the protocol within the Study Registration Wizard? The protocol cannot be edited within the Study Registration Wizard.
-
Can I add a publication that is in pre-print? Pre-print publications may be included. Once the publication is published the publication information can be updated in ImmPort using the study_design_edit.txt template and the ImmPort validation and upload process. Please contact the ImmPort team for assistance at ImmPort_Helpdesk@immport.org.
-
When adding a publication with a PubMed ID, do I need to fill the remaining fields on the form? No, filling the remaining fields is not necessary as the ImmPort system will automatically populate them after your study is registered.
-
Are there restrictions to the types of Study Files that can be uploaded? Study file formats can be .pdf, .txt, .csv, .xls(x), .doc(x) or other commonly used file types. Study files cannot be .zip files. Data contained in the study files may include adverse events, assessment results, case report forms, concomitant medications, data dictionaries, demographics, interventions, lab test results, medical history data, protocol deviation data, screening data, study medication and substance use. Should you have additional questions please contact ImmPort_Helpdesk@immport.org and an ImmPort team member will be happy to assist. We are generally able to respond to requests for help within 24 business hours.
-
When will my study be shared? ImmPort has monthly data releases. Please contact the ImmPort team to include your study in an upcoming data release, ImmPort_Helpdesk@immport.org. The current data release schedule can be viewed here.